This article is also published in many bookstores for the benefit of offline readers. The eBooks are DRM-free, while the printed editions compile multiple articles and feature original photography at full resolution.
You can find printed compilations here, and individual eBooks at Amazon Kindle, Apple Books, Kobo and other stores. The proceeds support the improvement of current articles and the development of new ones.
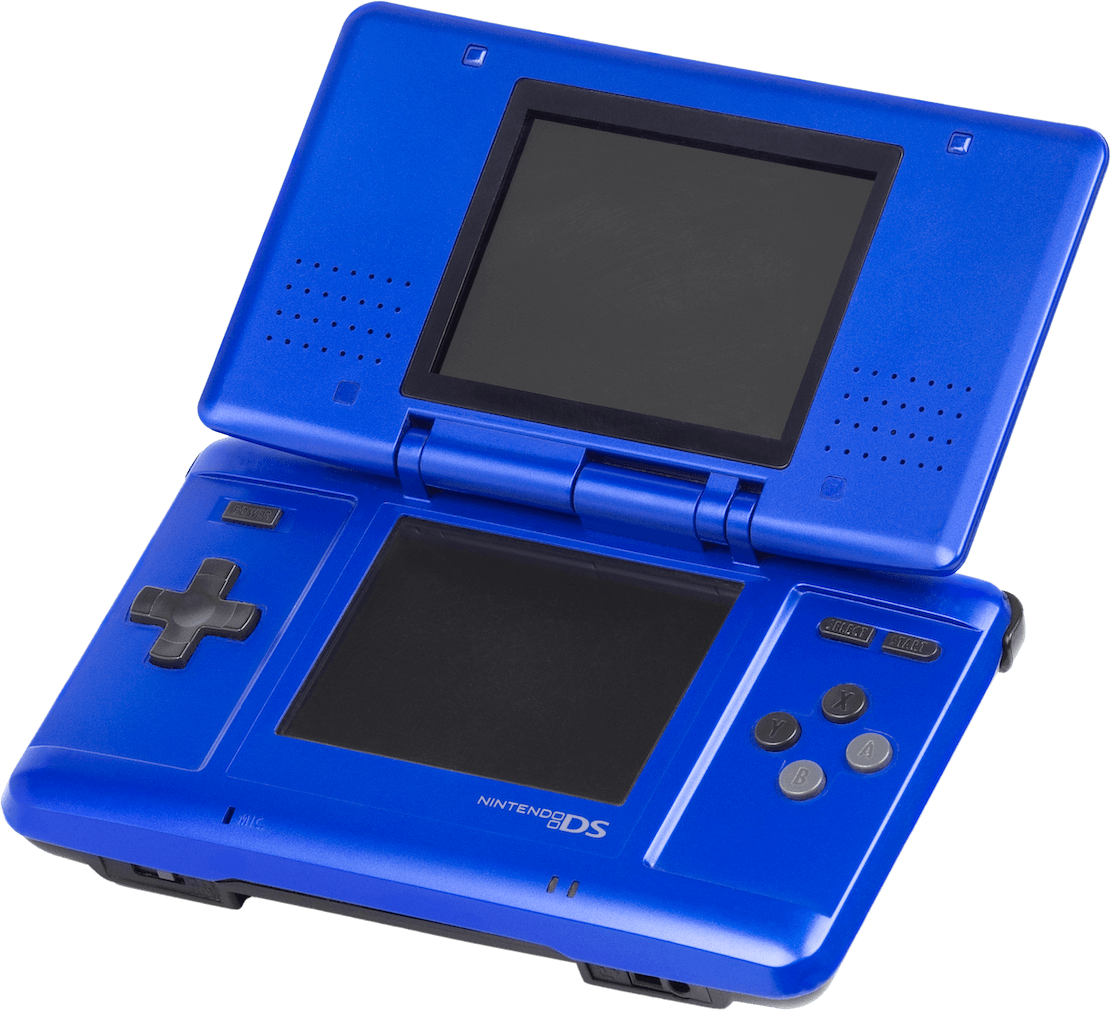
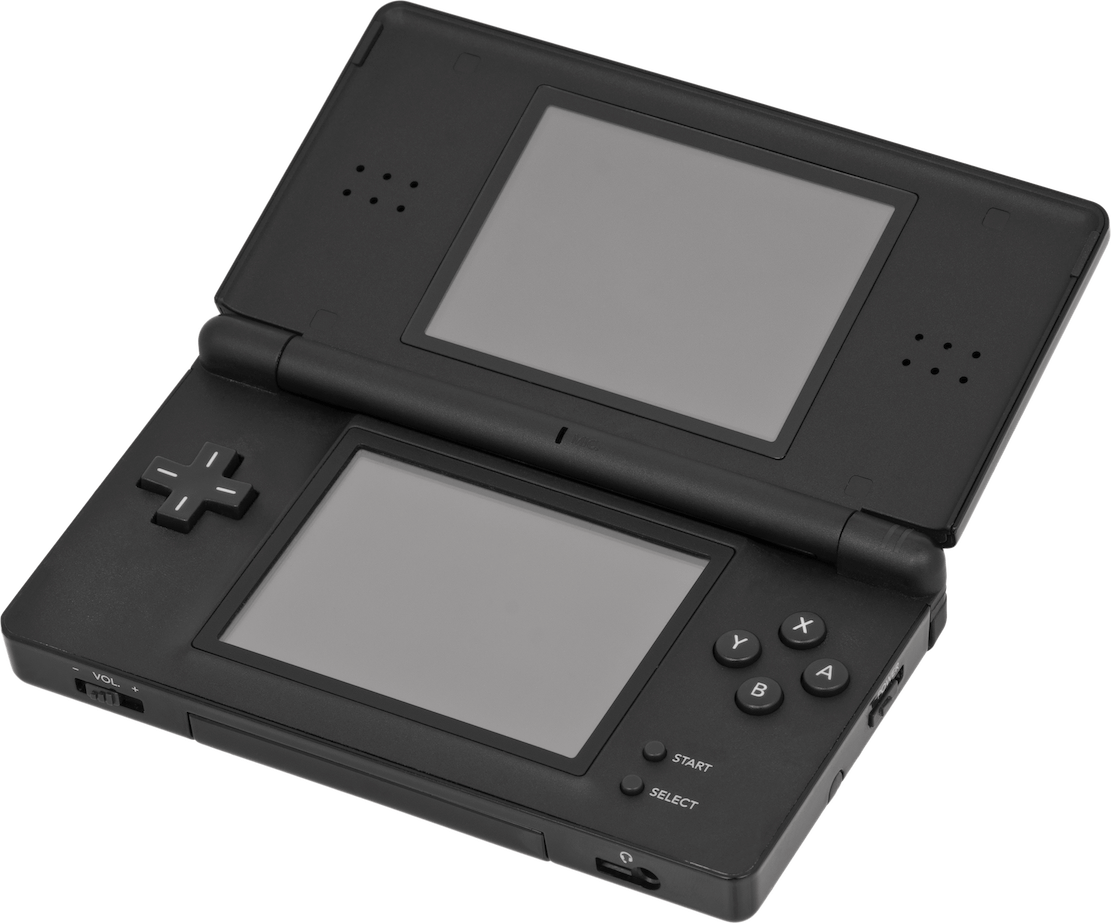
The original Nintendo DS (Blue edition). Released on 21/11/2004 in America, 02/12/2004 in Japan and 11/03/2005 in Europe.The Nintendo DS Lite (Black edition). Released on 02/03/2006 in Japan, 11/06/2006 in America and 23/06/2006 in Europe.
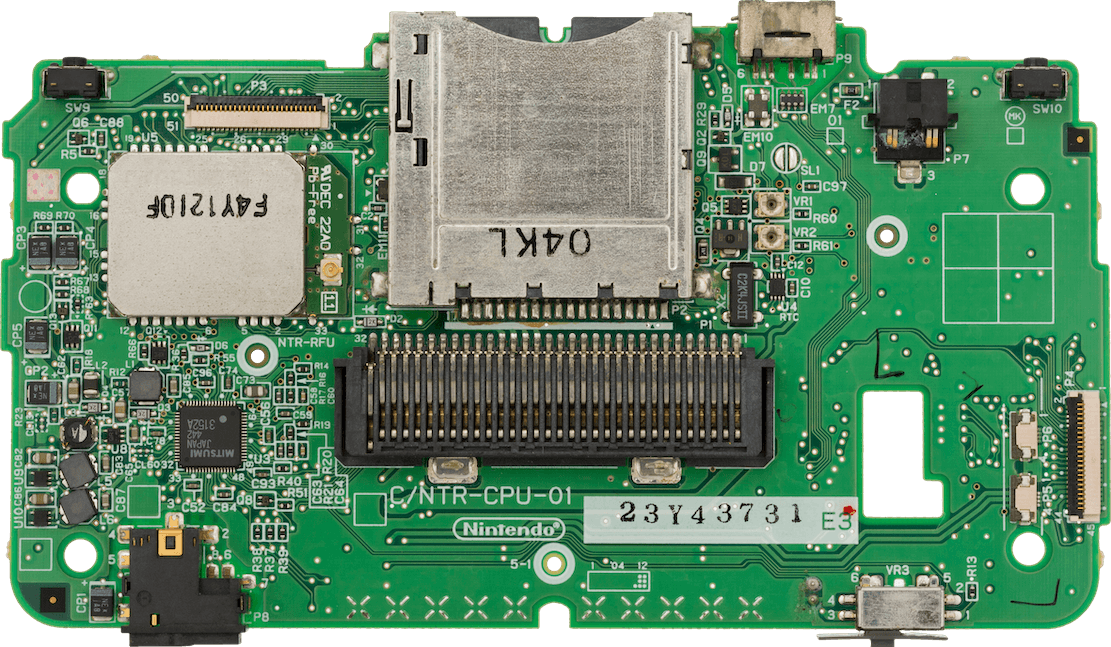
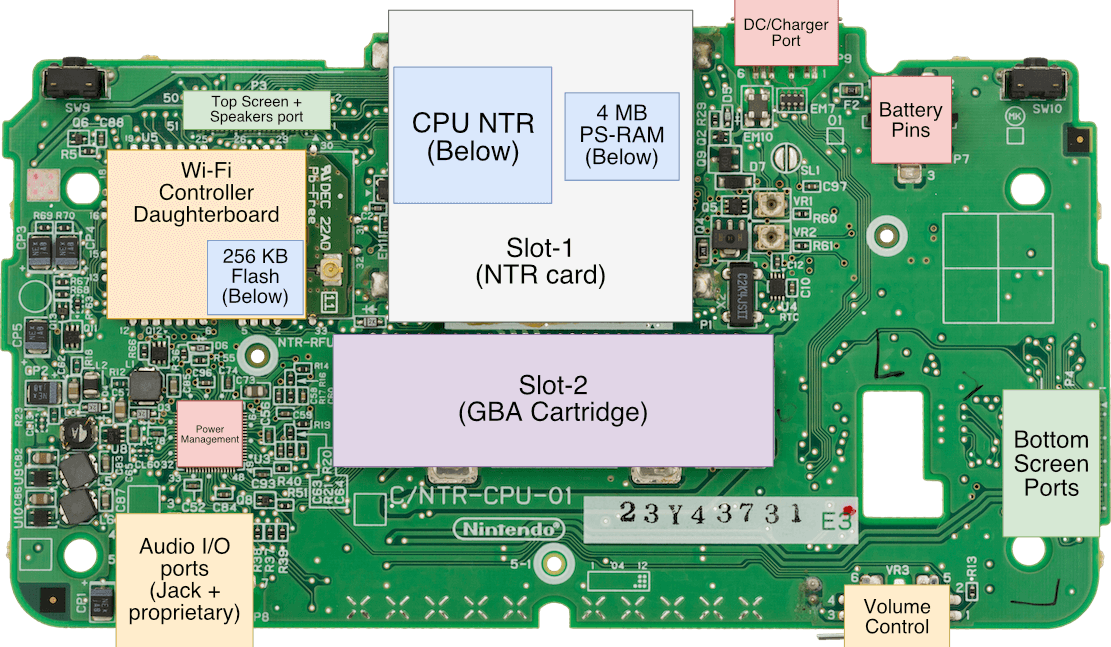
Motherboard Showing first revision.Motherboard with important parts labelled
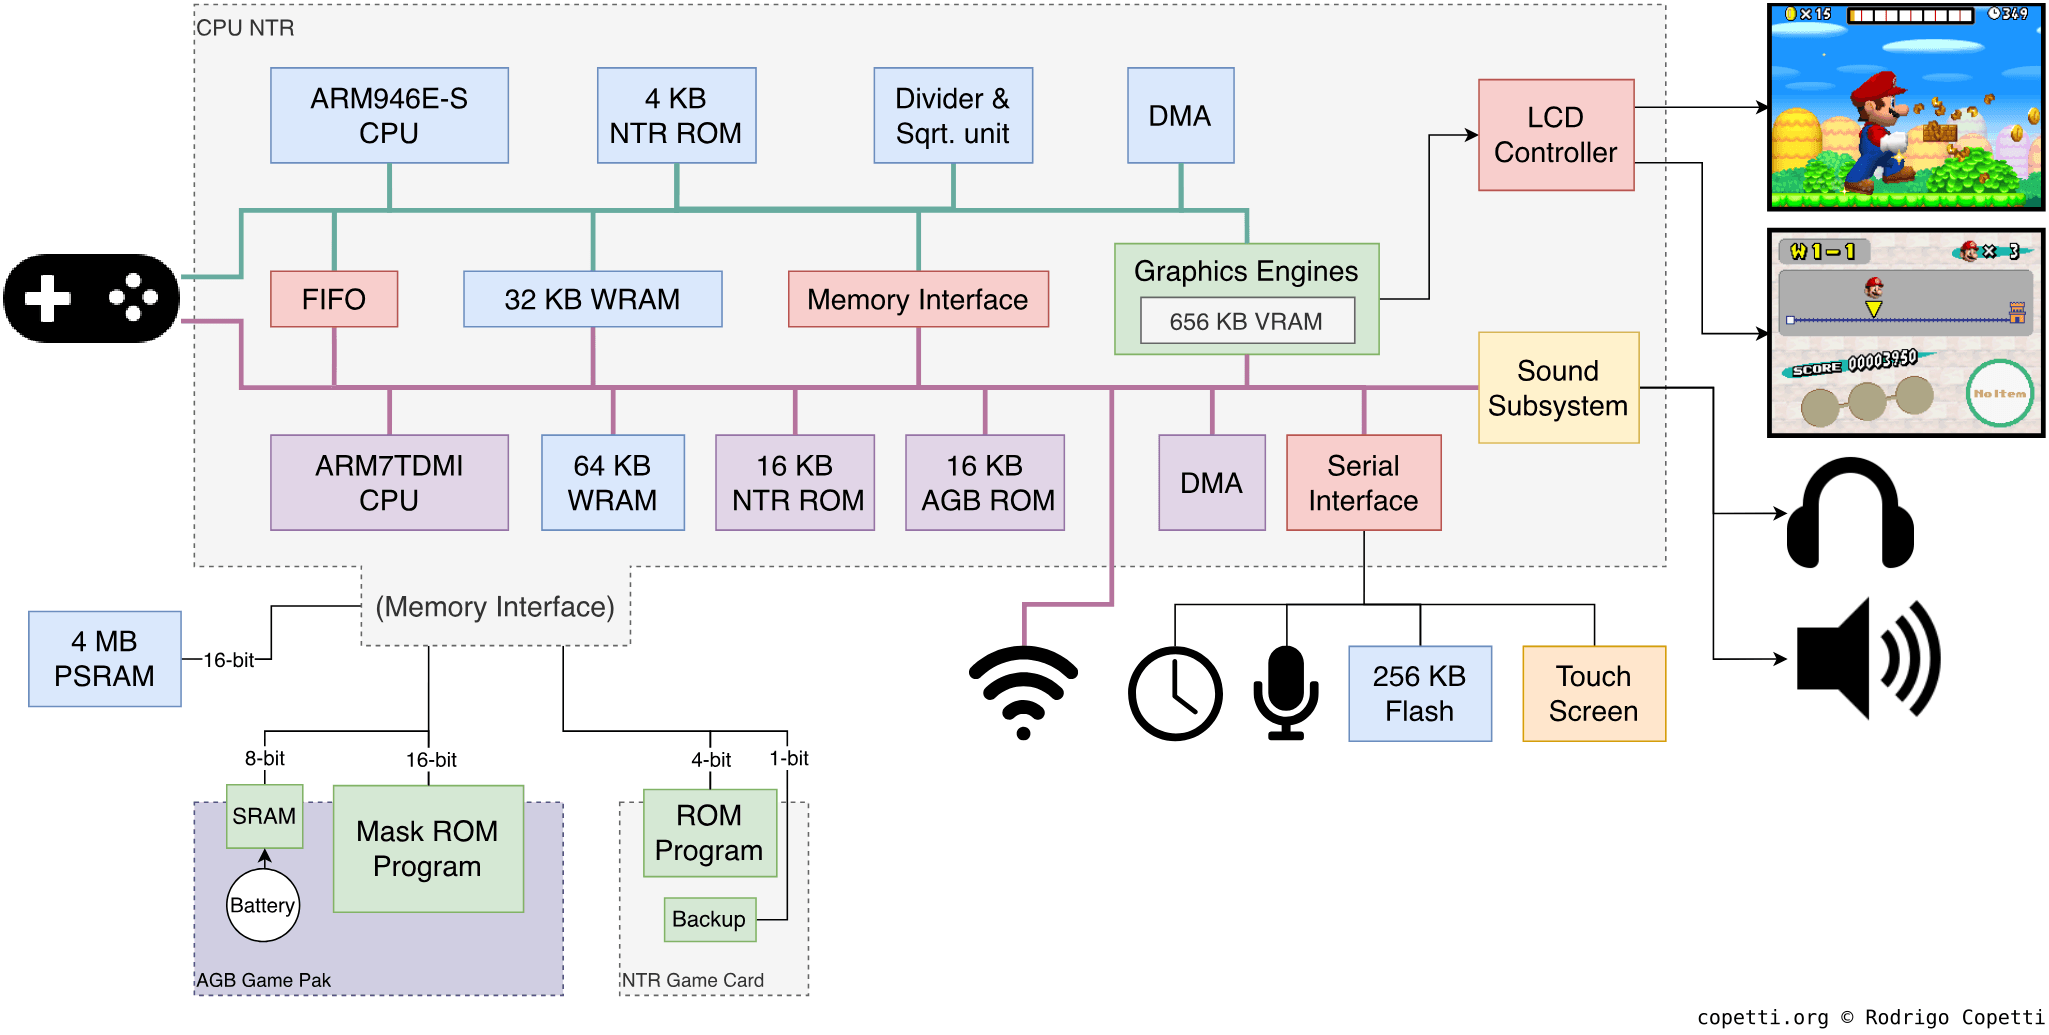
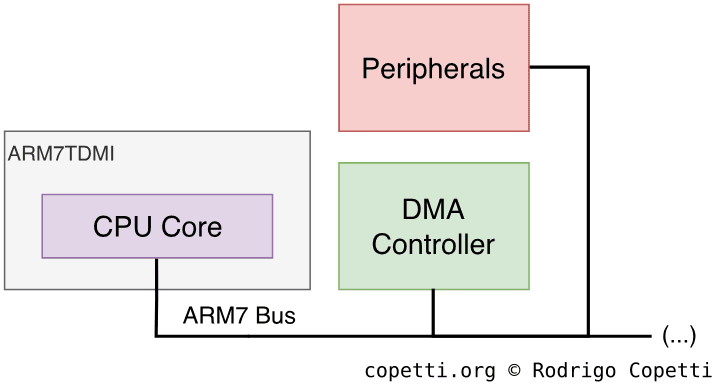
DiagramMain architecture diagram If you have trouble following the components: Top is only accessed by ARM9, bottom section is ARM7-only, middle section is shared.
A quick introduction
This console is an interesting answer to many needs that weren’t possible to fulfil in the handheld ecosystem. There will be some innovation and a few compromises, but this combination may pave the way for new and ingenious content.
CPU
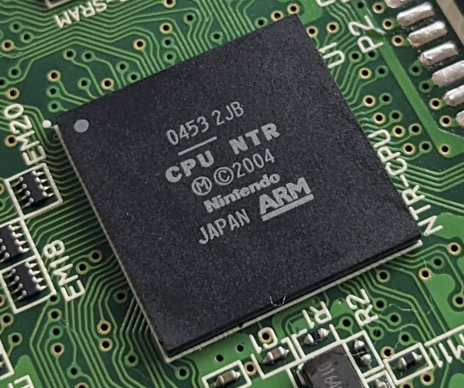
As with Nintendo’s previous portable console, the system revolves around a big chip named CPU NTR. ‘NTR’ is shorthand for Nitro, the codename of the original Nintendo DS. This System-on-Chip (SoC) is also the continuation of a prosperous Nintendo-ARM partnership, which originally started with the Game Boy Advance.
Now, before we check out the new CPUs, let’s look at how ARM evolved during the late 90s, as this impacted the technology ultimately found inside the Nintendo DS.
ARM’s new territories
During the mid-90s, ARM was experiencing an influx of businesses from the mobile market (before cellphones became ‘smart’). Yet, it struggled to please a particular sector: high-performance computing. The ARM7 was enjoyed by many mobile devices, but it didn’t quite satisfy Apple (with its ‘Newton’ PDA line) and Acorn (with its RiscPC line), both of whom shipped software that could benefit from a faster CPU. Aside from the lack of a 64-bit solution (something MIPS was already commercialising), ARM was also unable to produce a CPU that operated faster than 40 MHz. Altogether, the bottlenecks were starting to pile up.
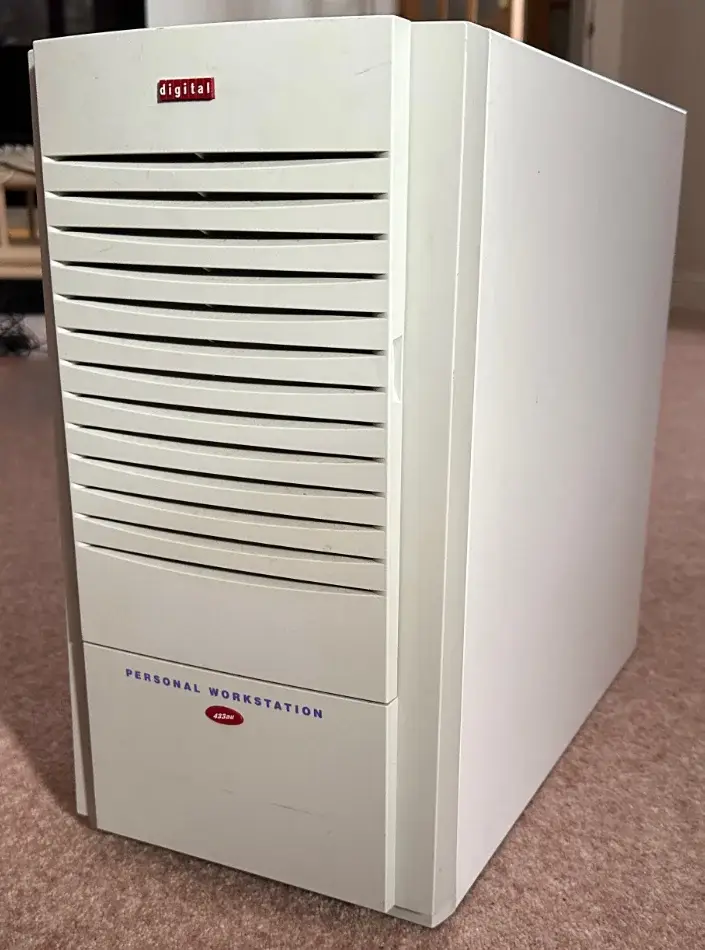
DEC’s ‘Digital Personal Workstation’ model 433au (1997), carrying an Alpha 21164A CPU.
Nevertheless, during the commercialisation of the ARM7 line, ARM had already started work on a successor called ARM8, the first attempt into the high-performance market. Coincidentally, Digital Equipment Corporation (DEC), the American company historically renowned for their line of PDP and VAX machines (the so-called ‘minicomputers’) along with the sophisticated VMS operating system, was experiencing an opposite problem: They struggled to deliver a low-power CPU based on their high-performance solutions.
Well, it so happened that ARM’s licensing model turned into an opportunity for DEC, who chose to develop a new CPU by borrowing materials from ARM (its instruction set and microarchitecture).
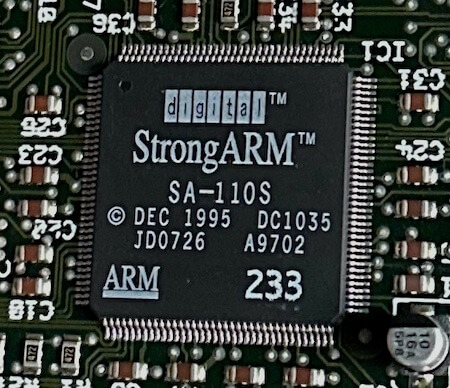
In the end, DEC grabbed the datapath design of their RISC-based Alpha processor and, with the help of ARM, mixed it with ARM’s microarchitecture [1]. This collaboration led to the StrongARM CPU, which was released in 1996 and targeted the performance sector.
A 233 MHz StrongARM CPU, part of the CPU upgrade card offered for the Acorn RiscPC.
StrongARM was a new ARM-based CPU that featured [2]:
The ARMv4 instruction set. If you want to know more about it, I’ve previously analysed it in the Game Boy Advance article.
Up to 233 MHz of clock speed, roughly 583% faster than the beefiest ARM7 chip.
5-stage pipeline, an increment from the original 3-stage design.
A new cache system implementing a Harvard architecture, where 16 KB are allocated to instructions and another 16 KB to data.
This design helped alleviate memory bottlenecks (something the von Neumann/Princeton model suffered from).
It’s worth mentioning that this chip still managed to work with a 3.3 V supply, like previous ARM chips. In fact, the StrongARM requires just 2 Volts and dissipates only 1 Watt [3]. By contrast, Intel’s 200 MHz Pentium chip draws 3.5 V and has a power dissipation of up to 15.5 W [4].
As expected, such was the impression on Acorn and Apple that both companies immediately shipped CPU upgrades and further Newton models, respectively, using DEC’s invention.
In the same year, ARM also released their promised ARM8-based CPU, the ARM810. It was comparatively slower and offered no practical advantages over the StrongARM. So, too little and too late resulted in no commercial interest. Consequently, ARM shifted its focus to improving the ARM7 line for the mobile market. However, the potential of DEC’s CPU was so disruptive that ARM Holdings absorbed StrongARM’s design [5] to produce their next line of CPUs, the ARM9 (which the Nintendo DS houses).
Turning points
Thanks to the StrongARM, ARM also cemented its position in the handheld market, completely displacing MIPS and SuperH as viable alternatives. From then on, ARM was en route to becoming the most widely adopted architecture for mobile devices [6].
Unfortunately for DEC, this CPU would be their last major achievement before being acquired by Compaq in 1998. The fate of StrongARM would then rest in the hands of Intel, who continued development under the new ‘Intel XScale’ line… until they liquidated the division to focus on ‘low-power’ x86 CPUs (i.e. the Intel Atom) [7]. Fifteen years later, not only has Intel lost its chance in the mobile market, but it now finds itself competing head-to-head with ARM in the desktop arena.
Nintendo’s debuting SoC
The silicon within the Nintendo DS is an interesting intersection between affordable and trailblazing technology. Aside from the aforementioned advancements, CPU NTR (the SoC) follows a multi-processor architecture that houses two different ARM CPUs: the ARM7TDMI and the ARM946E-S. This design was done before ARM Holdings officially released multi-processor solutions. So, their functioning may be considered a bit unorthodox (taking into account present technology).
The CPU NTR chip.
While this is not the first parallel system analysed in this series, its design differs significantly from the rest. For instance, we are not talking about the experimental master-slave configuration that the Saturn debuted, nor the co-processor approach found on the PS1 or N64. The Nintendo DS includes two largely independent computers that perform exclusive operations, each with its own dedicated bus. This design methodology is known as asymmetric multiprocessing, and the resulting inter-CPU dependency conditions the overall performance of this console.
Starting with the more familiar of the two, the ARM7TDMI is the same CPU found on the Game Boy Advance, but now running at ~34 MHz - twice its original speed. It still retains all of its original features (especially Thumb).
Now for the changes: because Nintendo’s engineers placed the ARM7 next to most of the I/O ports, this CPU is tasked with arbitrating and assisting I/O operations. In fact, no other processor can directly connect to the I/O. As you can see, this is not the ‘main’ processor that will be in charge of the system, but rather the ‘sub-processor’ offloading the main CPU by passing data around many components.
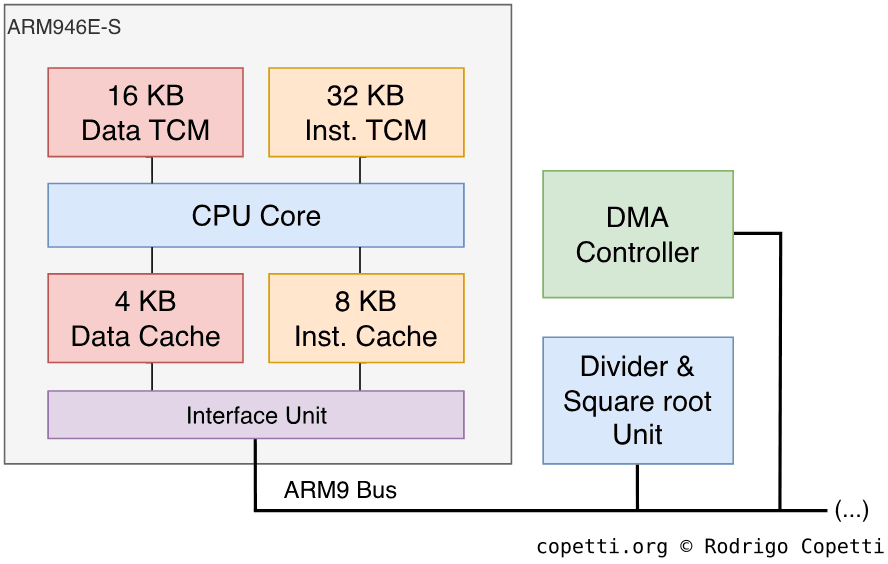
Here is the ‘main’ CPU of the Nintendo DS, the ARM946E-S. It runs at ~67 MHz, so not exactly ‘StrongARM speed’. Yet, as part of the ARM9 series, this core not only inherits all the features of the ARM7TDMI and StrongARM, but also includes some additional bits you may find interesting [8]:
The ARMv5TE ISA, an extension of the previous ARMv4 ISA and Thumb, offering more instructions and a faster multiplier.
If you take a look at the core name, the letter ‘E’ means Enhanced DSP, indicating that many of these new instructions relate to signal-processing applications.
The extended Thumb is sometimes called Thumb v2. It adds BLX and BKPT, which assist with switching between ARM and Thumb mode; and facilitate debugging, respectively.
A 5-stage Pipeline, like the StrongARM and ARM8 families.
12 KB of L1 Cache: Unlike the ARM7TDMI, the new core features cache and, akin to the Harvard-based StrongARM, allocates 8 KB for instructions and 4 KB for data.
The cache employs a write-buffer mechanism, allowing RAM to be updated asynchronously, so the CPU can work on other tasks.
48 KB of Tightly-Coupled Memory (TCM): Similar to Scratchpad memory, although here is discriminated between instructions (32 KB) and data (16 KB).
An integrated CP15 co-processor. It acts as a Memory Protection Unit (MPU), stipulating which memory ranges can be accessed, cached, or written to.
Nintendo also added the following components around the core:
A divider and square root unit to speed up these operations, as the ARM9 by itself is not capable of performing this type of arithmetic.
A Direct Memory Access (DMA) Controller: Accelerates memory transfers without depending on the CPU. When combined with caching, both CPU and DMA can potentially work concurrently.
Cache and DMA can provide a lot of performance but also introduce new problems, such as data integrity and coherence. Programmers must therefore maintain memory consistency manually, for example, by flushing the write buffer before triggering DMA.
I guess with hardware like this, it’s easy to figure out the real reason kids loved this console, eh?
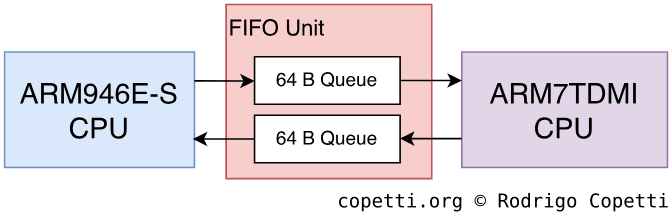
So far I have discussed how the two CPUs operate individually. But to work as a whole, they are required to cooperate constantly. To accomplish this, both CPUs directly ‘talk’ to each other using a dedicated FIFO unit[9]. This block holds two 64-byte queues (with up to 16 elements each) for bi-directional communication.
Representation of the FIFO unit.
The FIFO unit works as follows: the ‘sender’ CPU (the one that needs to transmit a message) places a 32-bit block of data in the queue, and the CPU acting as the ‘receiver’ can then pull that block from the queue and perform the required operations with it.
Whenever a value is written to the queue, either CPU can fetch it manually (polling). However, this involves repeatedly checking for new values, which can be expensive. Alternatively, an interrupt unit can be activated to notify the receiver whenever there’s a new value in the queue.
Main memory
Just like its predecessor, RAM is spread across many different locations, enabling the system to prioritise data placement according to access speed. In summary, the following general-purpose memory is available [10]:
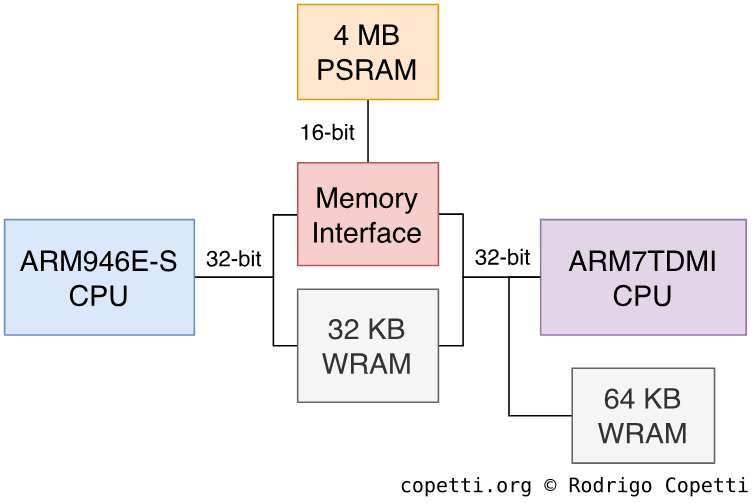
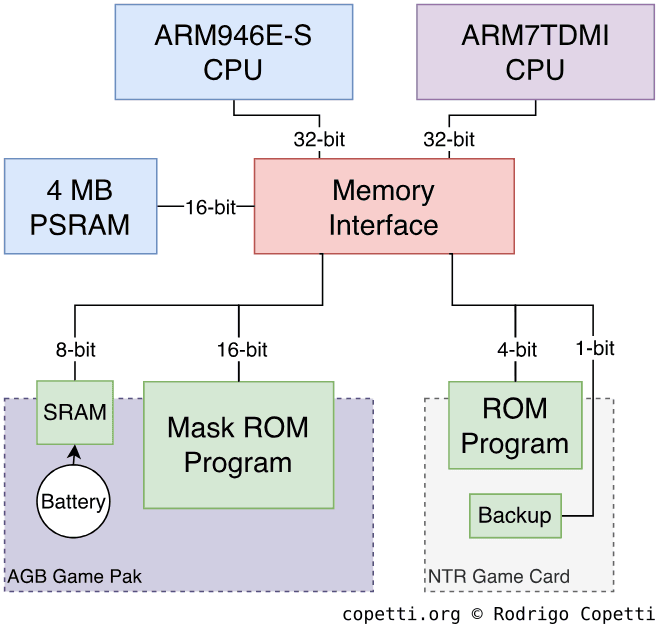
The memory architecture of the Nintendo DS.
32 KB of Work RAM (WRAM) on a 32-bit bus: Used to hold fast data shared between the ARM7 and ARM9.
Bear in mind that only one CPU may access it at a time.
64 KB of WRAM on a 32-bit bus: Also used for fast data, but accessible only by the ARM7.
4 MB of Pseudo-Static RAM (PSRAM) on a 16-bit bus: A slower type, available to both CPUs and arbitrated by a memory interface unit.
PSRAM is a variant of Dynamic RAM (DRAM) that, by contrast, performs its refresh cycles internally. Thereby, behaving like SRAM (the faster but more expensive alternative to DRAM). This design reminds me of 1T‑SRAM.
Backwards compatibility
Even though the Nintendo DS’ architecture is a radical departure from its predecessor, this console still managed to retain the critical bits that enables native compatibility with Game Boy Advance games.
But for the DS to morph into a GBA, the console includes a set of software routines that place it in AGB Compatibility Mode. When activated, these routines halt the ARM9, disable most of the novel hardware, redirect the buses, put the ARM7 in charge, and slow its clock speed to 16.78 MHz. Finally, the ARM7 executes the original AGB BIOS, which bootstraps the GamePak cartridge (just like an original Game Boy Advance).
AGB mode also exhibits some features not present in the original console, such as displaying the game with black margins (as the new screen resolution happens to be larger). Moreover, since the DS has two screens, users can set which screen will be used to display the GBA game.
Finally, once in AGB mode, there’s no going back. The console must be reset to reactivate the new hardware.
Unused Power
With so many sophisticated components fitted into a single, inexpensive chip, it’s no mystery that some issues emerged because of the way they were forced to work together.
Let me start with the ARM9, this CPU runs at twice the speed of the ARM7, yet most (if not all) of the I/O is handled by the ARM7. Thus, the ARM9 is prone to excessive stalling while it waits for the ARM7 to respond to I/O requests.
Additionally, the PSRAM bus is only 16-bit wide (still following the Game Boy Advance’s EWRAM model) and operates at half the ARM9’s clock speed. Consequently, whenever either CPU needs to fetch a 32-bit word from memory, the interface stalls the CPU, introducing up to three ‘wait cycles’ while the full word is reconstructed.
The degree of stalling varies significantly depending on the transfer type (instruction or data fetch) and the transfer width (16-bit or 32-bit). The worst scenario occurs during non-sequential 32-bit data retrieval, where the ARM9 spends five cycles per transfer. This is alleviated when the data is sequential, reducing transfer times to a mere cycle. However, the ARM9 doesn’t support sequential opcode fetching, so instruction retrieval gain no benefit. In other words, the same penalties apply regardless of whether instructions are adjacent.
All in all, this means that in the worst case, the ARM9’s whopping 66 MHz horsepower is practically reduced to a mere ~8 MHz. That is, if the program makes an abysmal use of the cache and TCM. In situations like this, however, I wonder if Nintendo might have mitigated the issue simply by increasing the amount of internal fast RAM. I also question if this is just technical debt carried over for the sake of backwards compatibility.
Anyway, for a detailed report, I recommend checking out Martin Korth’s documented timings [11].
Graphics
This section is a bit unusual because not only this console has multiple screens to draw, but also bundles traditional tile engines working alongside a modern renderer.
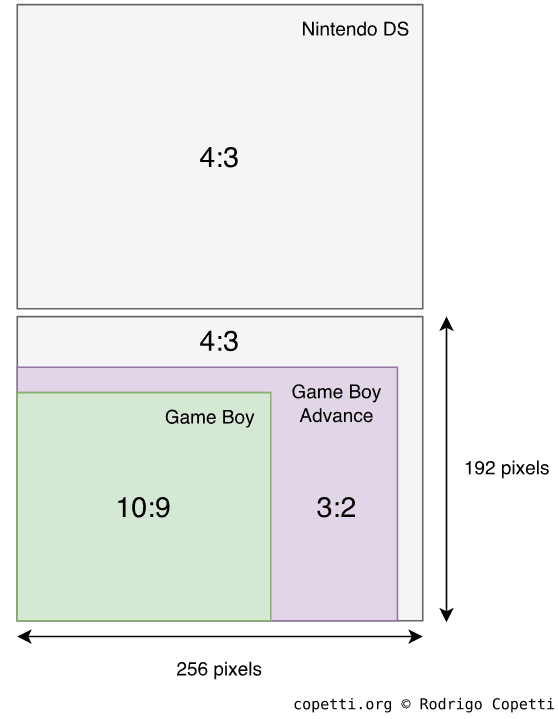
Comparison of screen resolution and aspect ratio between the Game Boy, Game Boy Advance, and Nintendo DS series.
Let’s begin with the physical attributes: the Nintendo DS contains two LCD screens, each 256 x 192 pixels in resolution, which is roughly 20% more pixels than the GBA. They can display 262,144 colours (18-bit) and refresh at ~60 Hz.
Architecture
The graphics subsystem can render both 2D and 3D objects. The former is composed of two-dimensional geometry - in other words, 8 x 8-pixel bitmaps called ‘tiles’. The latter draws three-dimensional objects (polygons) using vertices.
Diving into the internal chip that operates those screens, we can observe this console has distinctive hardware for 2D and 3D geometry. The 2D data is operated by a familiar engine, the Picture Processing Unit or ‘PPU’ (now just called 2D engine), while 3D data is handled by a completely new subsystem. That said, the console houses two 2D engines and one 3D engine. It’s worth mentioning that, while this is not the first Nintendo console to debut 3D graphics, it’s the first one to feature an in-house design to render 3D shapes.
Layout of the graphics subsystem.
Now, each engine can only be linked to one of the screens. This is not an issue for 2D-only games, as each screen has a 2D engine available. However, for those games that want to show off cutting-edge features, there’s only one 3D engine available. As a consequence, 3D capabilities are only available on one screen at a time.
… And what about mixing 2D and 3D objects? Absolutely, let me explain each engine separately so we can discuss this afterwards.
Constructing a frame with 2D graphics
Before we review each stage, I recommend reading about the GBA’s PPU since here I will only highlight the changes that led to the ‘next-generation’ of 2D games.
To set the stage, as there are two 2D engines, the first one is named Main while the second one is called Sub. This doesn’t necessarily imply which screen each on is connected to. On the other hand, Main provides a bit more functionality than Sub.
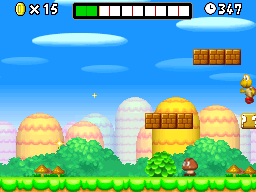
To support the explanations, this time I will be using New Super Mario Bros as example.
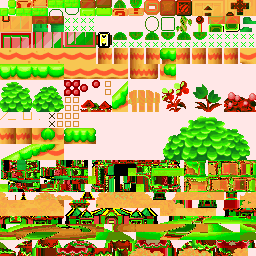
Some tiles found in VRAM. For demonstration purposes, a default palette is used.
By now we all know how a basic tile engine works, but how are tiles particularly managed on this console? Well, there’s a total of 656 KB of VRAM available [12], and this chunk is split into different banks: four of 128 KB, one of 64 KB, one of 32 KB and three of 16 KB. Programmers are free to fill these banks with drawings and then point the engine to the required data. Furthermore, both engines can read from any of the banks, but they cannot access the same one concurrently.
Nonetheless, there are some limitations on how data can be distributed. For instance, the ARM7 can only access two 128 KB banks. At the same time, these two banks can’t store sprites, and Sub is the only engine capable of accessing the last 16 KB bank. The list goes on, but you get the idea.
One last thing: the 3D engine, which we will dive into later on, can access some of these banks to fetch textures.
Ever since the Super Nintendo made its debut, subsequent designs of the PPU have been leaning towards providing more flexibility for background layers. Fourteen years later, this culminated in a chip capable of fetching tiles, applying many affine transformations, and, if that were not enough, assembling a layer directly from a frame buffer.
Before we discuss the different modes that the 2D engine uses to generate backgrounds, let me show you this list. It specifies the types of backgrounds the engine can generate:
Tile type group: These background types follow the traditional tile system. In other words, the frame is rendered by filling it with tiles.
Static background: An ordinary background, up to 512 x 512 pixels wide, using 256 colours and 16 palettes. It includes all the typical effects (H/V flipping and scrolling, mosaic, and alpha blending) plus an extra fading effect. Up to 1,024 tiles can be used.
Affine background: A background with affine transformations. However, it doesn’t allow H/V flipping and can only fetch 256 tiles (one quarter of the maximum). The size of this layer is 1024 x 1024 pixels.
Affine Extended: Same as affine but restores the full amount of tiles and supports H/V flipping.
Bitmap type group: Instead of processing tiles, the engine treats VRAM as a frame buffer.
Affine Extended (256 colours): Inherit all the effects available in the tiled ‘Affine Extended’. The difference is that they are now applied to a single 512 x 512-pixel bitmap.
Affine Extended (Direct colour): Similar to the previous type, but the frame buffer now supports up to 32,768 colours (15-bit).
Large screen: Eats up a whole 128 KB chunk of VRAM to render a large 1024 x 512-pixel frame buffer.
3D background: Displays the output of the 3D engine as a background layer, which is essential for showing whatever the 3D engine has processed. Although it doesn’t provide a lot of 2D effects, there are interesting features like horizontal scrolling and alpha blending (with other background layers). Also, it’s the only type that supports up to 262,144 colours (18-bit).
These modes can’t be chosen arbitrarily; instead, the console provides a set of background modes with predefined combinations. Be as it may, whenever a background mode states to support ‘Affine Extended’, developers are free to choose the flavour (‘Tiled’, ‘256 colours’, and ‘Direct colour’).
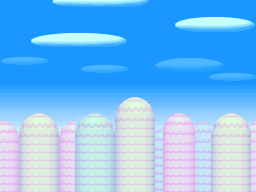
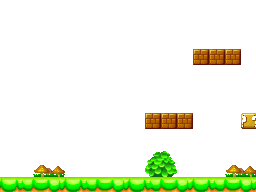
Background Layer 0 (BG0). This particular layer is shifted horizontally at certain scan lines to simulate the clouds moving.Background Layer 2 (BG2).Background Layer 3 (BG3).Static Background layers in use.
This is where the background types are put into action. Main and Sub offer multiple modes of operation. All of them generate four background layers, however, each layer has different capabilities depending on the mode activated [13]:
Because there is only enough space for a single frame buffer, this mode is available only on ‘Main’.
Additionally, in Modes 0 to 5, the Main engine can set the first static layer as a 3D background instead. The 3D capabilities will be covered in a second.
Sprites or ‘Objects’ inherit the same functionality as the GBA’s PPU, but with two considerable additions.
Firstly, Object Attribute Memory or ‘OAM’ (the region where sprites entries are stored) is now 2 KB wide [14], enabling to display up to 128 sprites per frame per screen. Thus, 1 KB is allocated per engine.
Secondly, OAM can now reference bitmaps from VRAM as opposed to only using tiles and palettes [15]. This is another departure from the tiling system. In fact, both sprite ‘modes’ can coexist in the same frame, since this option is set for each individual sprite.
As each layer renders on-the-fly, the final stage is tasked with merging everything and sending it to the selected screen. This is pretty much what happens with previous PPU-based consoles, does that mean we are done here?
Not yet! Main still has to fetch a layer from another engine, the most powerful one.
If you have played with a Nintendo DS before, you know by now that this console can display a particular amount of 3D graphics. Unlike some GBA games, however, these are not rendered by the CPU. Instead, CPU NTR includes two components that together constitute the 3D engine, a design that reminds me of SGI’s Reality Coprocessor.
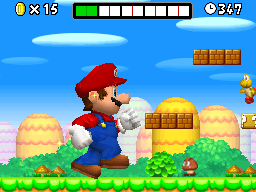
Cycling back to the ‘Background modes’ section, you’ll notice that every mode has at least one static background. This is because you can fill that layer with graphics produced by the 3D engine. The only caveat is that only Main can do this. This also explains why Mode 6 is only available on Main.
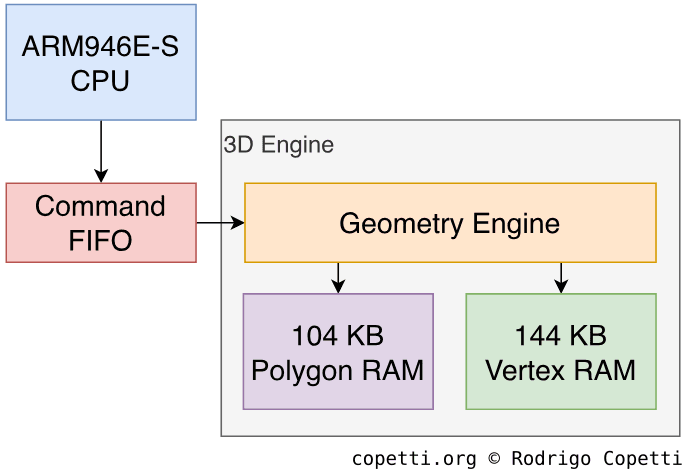
If you read any of the articles from the 5th or 6th generation, you may be wondering… Where’s the SIMD processor? That’s a good question because the ARM9 is not particularly good at vector operations and I don’t think the dedicated divider is enough. That’s why Nintendo embedded a component called Geometry Engine that takes care of vertex transformations, projection, lighting, clipping, culling and polygon sorting, the latter is essential to properly use the transparency features [16].
This engine has some strict limitations. Specifically, the count of polygons it can process: there’s an extra 248 KB of RAM used to store processed geometry. This amount accounts for up to 2048 triangles or 1706 quadrilaterals[17], although this limit can be stretched by using polygon strips (as opposed to individual polygons). Another point to bear in mind, is that the screen resolution of this console is relatively small, so that also compensates.
Anyway, this engine is commanded using a Command FIFO which is filled by the CPU or DMA [18]. The FIFO stores 256 entries, yet it’s complemented by another buffer called PIPE that stores four more commands (allowing a total of 260).
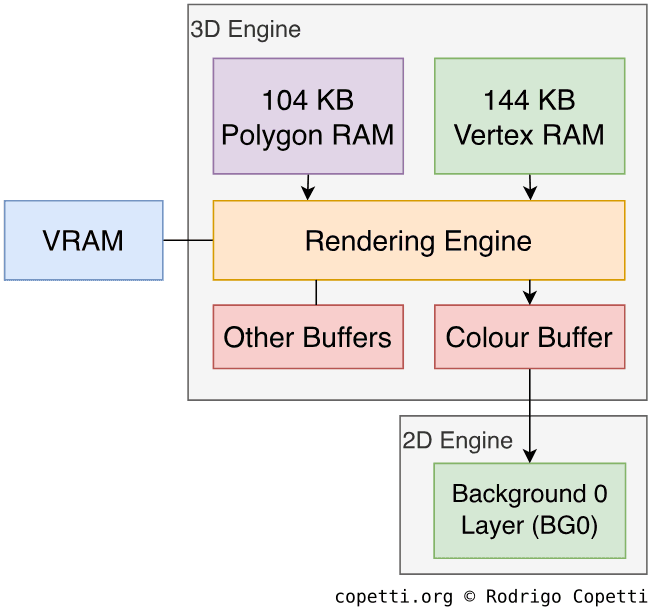
The Rendering Engine is in charge of converting vectors to pixels (i.e. rasterising), colouring them (i.e. texture mapping), and applying lighting and other effects [19]. It relies on perspective correction and Gouraud shading for interpolating textures and light, respectively. Moreover, the unit provides modern features like fog, alpha blending, depth buffering (either Z-buffering or a variant called W-buffering), stencil tests and anti-aliasing. However, the latter is very primitive (it just sets the outer edges of polygons as transparent) and it only works with opaque pixels.
The rendering system is a mix of old and new: instead of outputting a frame buffer, it employs line buffer rendering, where it fills scan lines (similarly to the 2D engine) and stores the results in a smaller buffer. This is because the 3D engine must work at the same pace as the 2D drawer.
Without the traditional frame buffer, the rasteriser employs scan line rendering, traversing each scan line to process any polygon edges found within. Arisotura (the developer of the MelonDS emulator) reported that, for each quadrangle, the renderer can only fill one span per scan line[20]. This can be a bit troubling, since the result gets messy if the quad is concave or contains crossed edges, for instance.
Regarding effects, the unit also provides shadowing and a distinct feature called Toon Shading (another name for Cel Shading): Even though this unit is not programmable, the lighting parameters can be altered to achieve a cartoony effect [21].
Instead of writing the results back to a frame buffer for display, the rendering engine writes to a block called Colour Buffer which stores up to 48 scan lines [22]. Each scan line is fetched by the 2D engine to fill the BG0 layer in a FIFO manner.
3D rendering starts before the 2D one, enabling the latter to apply transformations on the new layer if required. Main also allows to capture the 2D, 3D or combined frame generated, blend it with another frame in VRAM, and write the result back to VRAM - which can be displayed afterwards.
In terms of control, the rendering engine also enables its parameters to be altered mid-frame, thanks to double-buffering mechanism that preserves a copy of the previous state until the current frame has finished drawing. Thus, no tearing appears.
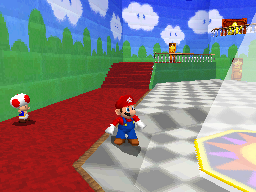
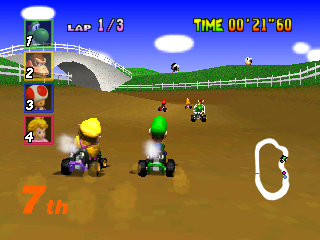
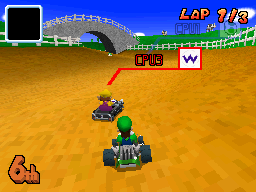
Some of the early games released for this console attempt to resemble Nintendo 64 counterparts. So I found this a good opportunity summarise why players may notice certain patterns between the two versions.
Super Mario 64 (1996). Rendered at 320×240 pixels.Super Mario 64 DS (2004). Rendered at 256x192 pixels.First example comparing the Super Mario 64 series.Mario Kart 64 (1996). Rendered at 320×240 pixels.Mario Kart DS (2005). Rendered at 256x192 pixels.Second example comparing the Mario Kart series.
To explain what’s happening here, I’ve organised the different explanations based on what some people said on forums:
NDS’ textures look more blocky: The rendering engine does not employ any filter. So, textures are interpolated using the ‘nearest neighbour’ approach.
NDS’ textures look richer: The rendering engine is not limited by a 4 KB Texture Memory block. Instead, there are up to 512 KB of VRAM available and plenty compression mechanisms provided. Thus, naturally more data can be loaded.
NDS’ models contain pixelated edges: NDS models render at a lower resolution compared to the N64 counterparts.
NDS’ textures appear distorted when seen from a distance: The rasteriser operates fixed-point coordinates. Low resolution and lack of mip-mapping also contribute to aliasing.
That’s pretty much in a nutshell. For more specialised cases, you’ll have to dive deeper into both engines and possibly disassemble both games to investigate which functions are being used and how.
Model designs
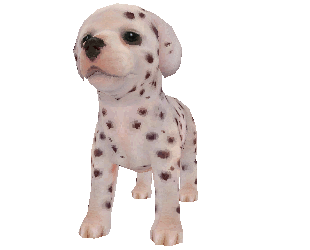
The following are 3D models visualisations from games designed for this console. Notice the use of detailed texture maps, albeit limited to nearest-neighbour filtering. This results in a ‘modernish’ pixelated look, an icon of Nintendo DS graphics.
Wireframe
Surface
Textured
Tap to enable interaction
Nintendogs (2005). 750 triangles.
Wireframe
Surface
Textured
Tap to enable interaction
New Super Mario Bros (2006). 636 triangles.
Despite we talked about many limitations of the graphics subsystem, I have to say, lots of games knew how to leverage it.
Audio
We’ve already seen how Game Boy Advance games were provided with a mix of modern synthesis with legacy characteristics, leading to later games ultimately prioritising the contemporary elements (i.e. sample-based synthesis). With the Nintendo DS, the new audio subsystem focuses on addressing the constraints of the modern Pulse-Code Modulation (PCM) channels to unlock higher fidelity.
Oscilloscope display of the mixed stereo output during a game of Last Window: The Secret of Cape West (2010).
As a result, the new audio suite features a total of 16 PCM channels, allowing to shift the mixing task from the CPU to dedicated hardware. Internally, PCM samples can now be 8-bit (GBA-style), 16-bit (the optimal resolution), or ACPCM (a compressed form) [23]. In all cases, the mixer produces a stereo signal that can be played through the speaker - now stereo - or through headphones. It can also write the resulting stereo data to WRAM, enabling the sub-processor (ARM7) to apply effects such as reverb.
With all being said, does this mean the Nintendo DS can finally process popular codecs such as MP3? Yes, in fact, some homebrew programs implemented some form of it. However, audio decoding still takes up significant bandwidth, processing power, and storage [24]. So, audio sequencing kept its place as the most feasible option.
An eccentric Programmable Sound Generator (or two)
Since this console can natively run GBA games, it should therefore house circuitry that resembles the predecessor’s Programmable Sound Generator (PSG), whether in hardware or software form. As it happens, the last six PCM channels do include a ‘PSG mode’. This allows them to synthesise either a pulse wave or a custom waveform, while only two can generate noise. However, for some reason GBA games do not make use of PSG mode!
You see, the mixer’s output is sent to the speakers and headphones via a 10-bit Digital-to-Analogue Converter (DAC), whose output frequency is 32 kHz[25]. This is considerably lower than the quality of the samples fed. Furthermore, it does not perform any form of interpolation to smooth out the loss of precision. These cost-cutting measures are not ideal for sample playback, as they add noise. Though the extent to which this is perceptible depends on your hearing: in my attempts to identify the extra noise, I didn’t notice a ‘hiss’ until I boosted the volume and compared it side-by-side with a 16-bit variant. And to be fair, the sound system is still a step forward from software-mixed samples with 8-bit resolution. Conversely, the aliasing effect is more problematic with PSG sounds, as downsampling the signal introduces erroneous harmonics which distort the original PSG tone. Nevertheless, games like New Super Mario Bros. happily make use of pulse waves for accompaniment, so I wouldn’t consider PSG mode completely useless.
Back on topic, how does a GBA game handle all of this? It doesn’t. Within the same enclosure, Nintendo fitted a separate sound system for AGB mode, complete with its own channels and mixer that follow the specifications of the predecessor. This way, GBA games are unaffected by the new mixer’s constraints. Unfortunately, since this subsystem is segregated from the DS’s one (in other words, it doesn’t output to the DS’s mixer), DS games can’t make use of it.
Interactive comparison
I’ve constructed this interactive widget to let you compare how the new audio system influenced the next generation of soundtracks. Each widget plays the same score but allows you to alternate between the old and new arrangements (I suggest wearing headphones to really notice the difference). Give it a whirl!
GBA: Mario Kart: Super Circuit (2001). NDS: Mario Kart DS (2005).
Be as it may, I had to boost the gain of the GBA soundtrack a little bit to match the loudness. This affects the signal-to-noise ratio - just something to bear in mind while you switch between the two. Anyway, I hope you got a sense of how the sound subsystem has evolved.
Some struggles
Let me show you some tricky cases now. In some ports, the original console had unique audio capabilities that weren’t straightforward to recreate on this console, but I’ll let you be the judge of that:
SNES
Nintendo DS
Tap to enable interaction
SNES: Super Mario Kart (1992). NDS: Mario Kart DS (2005).
Mega Drive
Nintendo DS
Tap to enable interaction
Mega Drive: Sonic 3D Blast (1996). NDS: Sonic Chronicles (2008).
As you can hear from the first example (particularly in the final ten seconds), it is hard to compete with the quirks that the SNES’ S-SMP provided.
I must confess the second example was included on purpose. I mean, what the freck happened there right? As if the new arrangement were initially intended for an Atari console instead. If you ask me, the Nintendo DS could have handled some sort of FM-to-PCM resampling, so the new minimalistic arrangement may just be a creative choice.
I/O
To be honest, the I/O capabilities of the Nintendo DS are worthy of separate study. Once unaffordable equipment such as wireless connectivity, a touchscreen, a Real Time Clock (RTC), and a microphone, combined with flagship software, made this console stand out every single year of its lifecycle. I would say Nintendo delivered the right innovation, at the right price, at the right time; a philosophy reaffirmed with the arrival of the Wii, two years later.
Under the hood, however, I/O components are strictly handled by the ARM7. In fact, you won’t see much activity on that CPU beyond passing data around… which ultimately leaves the ARM7 a bit underused.
Accessing cartridges and memory
Starting with the internals, there’s a Memory Interface block connecting three endpoints:
A 17-pin Slot-1, where Nintendo DS cards go.
A 32-pin Slot-2, where GBA Game Paks or accessories (e.g. the Rumble Pak) reside.
4 MB of PSRAM, that’s main memory.
The interface can be accessed by both CPUs, but it contains registers that are modified to prioritise one CPU over the other, if two requests are issued on the same bus at the same time.
External memory model with labelled data bus width.
Inside Slot-1 cards
Now, here’s the challenging bit: unlike the old GamePak, DS cards are not memory-mapped, they use multiple serial interfaces to communicate. So, for either CPU to read the card’s content, this must be copied to RAM first.
In the case of the card’s ROM chip, The CPU must send blocks of 64-bit commands, referencing 32-bit addresses, to the DS card. Afterwards, the data can be retrieved either by pulling from a 32-bit register or through DMA. The data bus is 4 bits wide and, depending on the type of ROM fitted, it can reach speeds of up to 6.7 MB/s[26].
Alongside the DS card ROM, there is typically a ‘backup’ chip used for storing save data. These chips are instead accessed using an Serial Peripheral Interface (SPI) bus [27]. In there, we may find:
Ferroelectric RAM (FRAM): Behaves like Static RAM (SRAM) but doesn’t require a battery.
Curiously enough, some games repurposed the SPI bus to include special hardware, such as:
An Infrared controller: Certain Pokémon titles bundle an infrared sensor and emitter in their card, either to communicate with an external pedometer (the Pokéwalker), or to interact with other players before using Wi-Fi (I’m guessing, as an extra copy-protection mechanism).
A Bluetooth 2.1 controller: The game Learn with Pokémon: Typing Adventure housed a Broadcom BCM2070 controller inside its card [28][29]. This was used to connect to the wireless keyboard included with the game’s box.
A MicroSD adapter: The Japan-exclusive DSvision ‘game’ allowed users to play movies on the Nintendo DS (you could call it a spiritual successor to GBA Video). The movies were either sold on 512 MB DSvision-branded MicroSD cards [30], or downloaded from their servers and transferred using a proprietary USB-MicrosSD adapter [31]. In both cases, the data employed digital rights management to prevent third-party access or modification.
You may recall MicroSD as the main ingredient for ‘Flashcards’. The idea is similar but the execution is very different. I go into more details later in the ‘Anti-piracy’ section.
Inside Slot-2 cartridges
At the bottom of the console, the Slot-2 is memory-mapped using the original pinout, but the addresses are slightly shifted in DS mode. However, just like the GBA, the ROM data bus is 16-bit wide and the RAM data bus is 8-bit wide.
Peripherals
The ARM7 is also connected to another SPI node that interfaces with the touchscreen controller, which drives the bottom screen. It is made of a resistive panel, requiring the use of a stylus. The bus also connects to flash memory, where the firmware is stored (more details are explained in the ‘Operating System’ section).
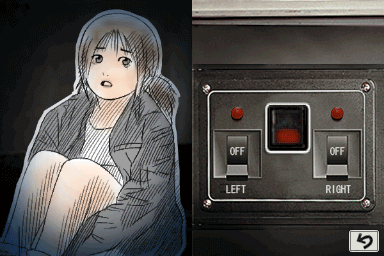
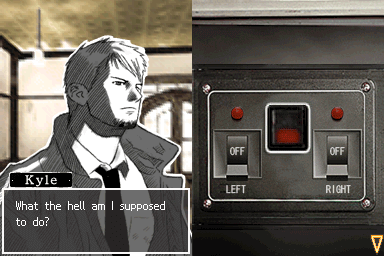
A switchboard puzzle. To rescue the lassie, the player had to swipe the screen using two fingers at the same time to switch on the lights.But if you do it wrong…Hotel Dusk: Room 215 (2007).
A curious aspect of this touchscreen is that, in addition to detecting the X/Y positions, it can also return the diagonal position (used to calculate the ‘pressure value’, which represents the area over which pressure is being applied). Unfortunately, this was never officially exposed. So, as far as I know, no commercial game made use of this undocumented feature, except homebrew.
As soon as this article was shared across different forums, many readers pointed out that Hotel Dusk: Room 215 relied on this feature for one of its puzzles, where the player is instructed to use two fingers at the same time. This is not the case, however. After running a series of experiments with the no$gba debugger, I noticed the puzzle does not make use of pressure data. Instead, it checks whether the X/Y values alternate sharply. The game interprets this behaviour as though the player were pressing the screen with two fingers.
The touchscreen controller is also connected to the console’s microphone. Games operate it by simply switching an amplifier on, and then issuing SPI commands to get its input, bit by bit [32]. The captured audio has a resolution of 8 bits, but its sampling rate depends on how many cycles the ARM7 plans to dedicate to pulling samples. In general, while the microphone is very primitive in terms of capability, games either used it as a basic speech detector, or to identify actions such as blowing into it. WarioWare: Touched! and the Nintendogs series are examples of games that leveraged microphone use.
Finally, in the same stack, we find the Real-Time Clock (RTC). Some titles relied on it to evolve their scenery as time progressed. Games like Animal Crossing: Wild World, The Sims 2, and the Pokémon series are notable examples. The operating system in this console also kept an internal calendar for one of its services.
Wireless network
Last but not least, the console houses a dedicated Wireless Controller that implements the IEEE 802.11b specification, also known as ‘Wi-Fi’. The controller operates in the 2.4 GHz band, where Nintendo implemented many innovative services to enable multiplayer gaming [33]:
Internet Play: The console connects to an existing Wi-Fi Access Point (AP) to communicate with an online server.
This time, Nintendo provided the necessary network infrastructure and libraries to handle authentication and matchmaking. Afterwards, all client-server communication was handled by servers bundling SSLv3 certificates signed by Nintendo [34].
For encrypted Access Point connections, the console supported only Wired Equivalent Privacy (WEP), a protocol that is now considered insecure.
Multi-card Play: Sets up the Nintendo DS as an Access Point with a custom identifier, allowing up to 15 consoles to connect to it.
Single-card Play: The successor of Multiboot, enabling the game to upload a small program to another DS. This was particularly useful when a group of friends had only one copy of the game card.
You may remember that these were also marketed under the memorable ‘Nintendo Wi-Fi Connection’ logo.
Operating System
I suppose it’s safe to say that, by this generation, consoles always come bundled with some sort of abstraction layer and interactive interface. The Nintendo DS still inherits the previous operating system model, consisting of lightweight APIs to simplify I/O access, but now including a minimal user interface to tweak settings and fiddle with some of its ‘apps’.
Having said that, this console’s operating system is diversified across multiple chips, so let’s start with those that are read upon boot.
Entry point
From the start, the ARM7 and ARM9 must initialise the hardware before doing anything meaningful. To carry out this, CPU NTR (the SoC) embeds two small ROMs:
A 4 KB BIOS connected to the ARM9’s bus.
A 16 KB BIOS connected to the ARM7’s bus.
When the console powers on, each CPU boots from its respective ROM. This is because their reset vectors point to each chip. For reference, the ARM9’s vector is at 0xFFFF0000, while the ARM7’s is at 0x00000000[35].
The next stage
Moving forward, each BIOS stores two sets of routines: boot code and interrupt calls. The latter is no stranger given the history of the previous console, but the former has grown in complexity. Apart from initialising the hardware, the ARM7 code also performs security checks on the DS card and copies the system firmware to main RAM.
The system firmware is retrieved from a 256 KB Flash memory, which resides in the Wi-Fi daughterboard and can only be accessed through the SPI bus [36]. The same chip also stores various user settings (language, nickname, birthday, alarm, and a welcome message) as well as system settings (touchscreen calibration, first-startup flag, firmware version, and Wi-Fi settings).
After completing their respective boot routines, both CPUs synchronise so they can start acting as a ‘single machine’. It turns out the ARM9 finishes loading way before the ARM7, so the ARM9 sends a 4-bit value to the ARM7, and then stalls in a semi-endless loop until the ARM7 responds. Once it does, both processors proceed to load their first program from RAM: the firmware.
Window of opportunity
If you ever played with a Nintendo DS, you probably have noticed you can only play games if the card is inserted before turning on the console. This is because the ARM7’s BIOS performs some checks on the card during boot (I explain more in the ‘Anti-piracy’ section). If all the tests pass, ARM7’s game executable is then copied to WRAM, and ARM9’s executable is copied to Main Memory.
If the executables are not copied (either because the card is not valid or not detected during boot), the game can’t be started and the user will have to reset the console to try again.
Interactive shell
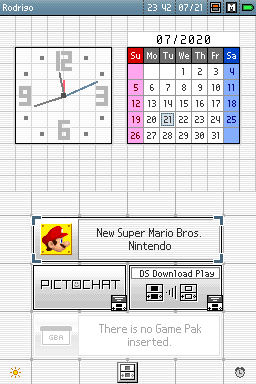
Whether a game is present or not, the system completes its boot process by loading the firmware’s interactive shell.
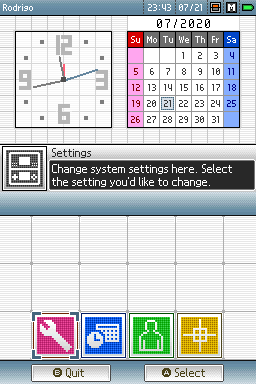
Home screen.You see this screen every time you switch the DS on. The ‘Nintendo’ logo only appears when there is a valid card inserted.Settings screen.
The shell is broadly similar to the rest of its contemporaries. Users rely on it to launch their game, change settings, download software via ‘Download Play’, or fiddle with PictoChat: an open chat room that talks to nearby Nintendo DSes (using the ‘Multi-card Play’ protocol).
It’s worth emphasising that both read-only and writeable data reside in the same (rewritable) Flash chip, so it’s theoretically possible to overwrite the firmware! Luckily, or for obvious reasons, Nintendo protected the upper quarter of the chip (64 KB) from being written by requiring a jumper placed on a point of the motherboard called SL1, which is exposed by removing the battery compartment. Nonetheless, overwriting the remainder of the flash memory can still produce catastrophic results [37]!
Upgradability
Lastly, this firmware ended up being updated by Nintendo a handful of times (five, to be precise) in an effort to patch security vulnerabilities. The updates weren’t installable by the user (recall the SL1 protection). Instead, Nintendo included the revised firmware into subsequent manufacturing batches.
Games
There’s plenty to talk about here, primarily because the capabilities of this console inspired programmers and artists to come up with innovative designs and new methods of interaction. Let’s see…
Medium
This console runs games from three sources, where only two of them can make ‘full’ utilisation of the hardware:
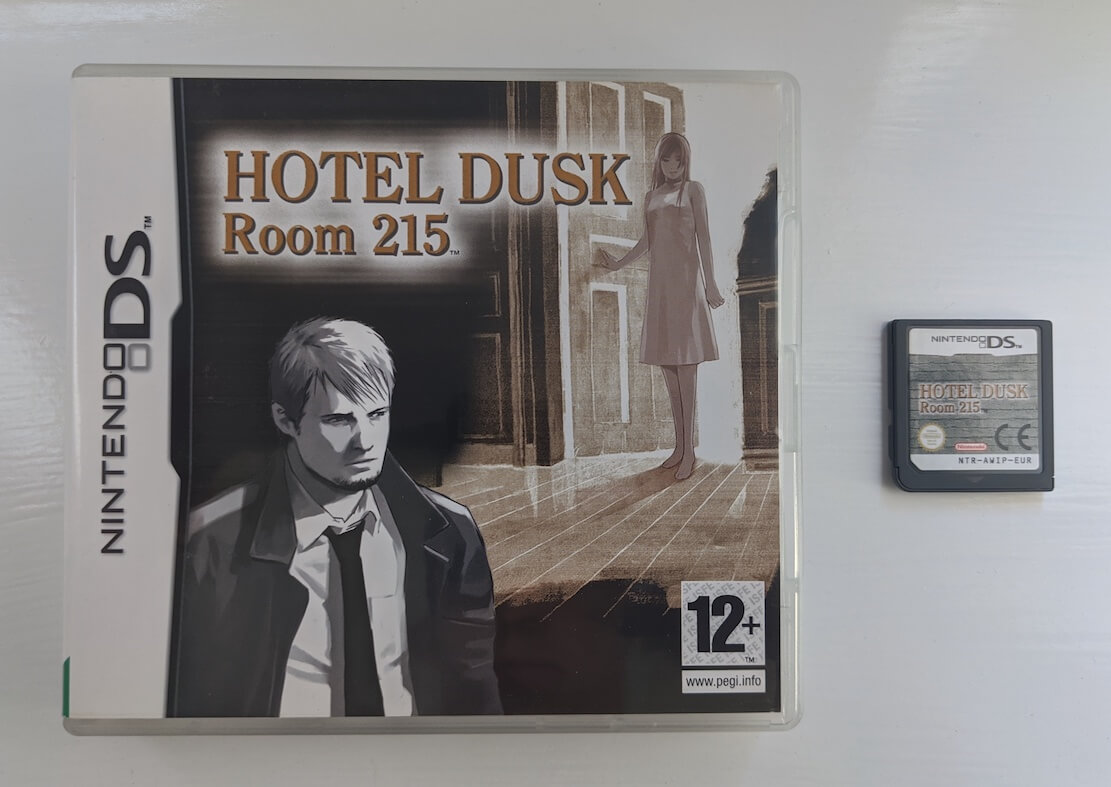
Example of a Slot-1 retail game.
NDS or ‘Slot-1’ cards: This is the main medium for loading native DS games, and the only format used for commercial distribution.
GBA or ‘Slot-2’ cartridge: This slot is one of the pillars of native Game Boy Advance compatibility. However, since Slot-1 games can also access this interface, expansion cartridges were developed to enhance DS programs. These provided additional RAM, extra input controls (e.g. the Guitar Hero Grip Controller), or haptic feedback (i.e. the Rumble pack).
Download Play: Also known as ‘Wireless MultiBoot’, this enables another console running a Slot-1 game to transfer a program via wireless communication. The downloaded content is stored in WRAM and booted after the transfer finishes. Since WRAM is volatile, the downloaded data is erased when the console is powered off.
Authorised retail stores used this feature to deploy Download Stations, where consumers were invited to download game demos.
Program structure
You’ve seen that this console’s BIOS must be split into ARM9 and ARM7 code. Well, the same principle largely applies to games. Thus, the ROM inside NDS cards is organised into the the following areas:
Header (4 KB): Contains metadata, including the entrypoint of each executable, manufacturer information, and Nintendo’s Logo [38].
Secure Area (16 KB): Used for copy-protection purposes. We’ll cover the details in the ‘Anti-piracy’ section.
Main content (variable size): The remainder space stores the executables and game data (graphics, sounds, and so forth). Furthermore, the arrangement of this data was shaped by Nintendo’s official Software Development Kit or ‘SDK’ (a mandatory dependency for retail games), which implemented a filesystem structured hierarchically with files and directories [39].
Development ecosystem
For game studios interested in developing games for this console, Nintendo supplied both hardware kits and a Software Development Kit (SDK) with lots of utilities.
The development kit, called IS-NITRO-EMULATOR, consisted of a medium-size blue unit housing most of the DS’s internal hardware and I/O components [40]. Attached to it was a thick cable connected to a dummy Nintendo DS shell, serving as a ‘controller’ and display. On request, the devkit could be fitted with optional capabilities such as Audio/Video out, a real Wi-Fi interface (by default, Wi-Fi was emulated using Ethernet), and debugging support. To be honest, I expected the latter to be a standard, but these units could also be used by testing teams.
The kit reads DS cards, yet Nintendo also provided rewritable development cards to ease the life of developers. These featured a larger case with swappable backup chips [41].
Overall, these are only a handful examples, but throughout the console’s lifetime, many other pieces of equipment were sold to help with certain tasks, such as music composition, where Nintendo offered ‘IS-NITRO-UIC’, a MIDI adapter linking the Nintendo DS to a PC.
By contrast, DS-NITRO-SDK was the software counterpart. This package included utilities for interacting with the devkit, the C and C++ toolchains, and the hardware APIs [42]. Notably, Nintendo forbade any attempt to circumvent the provided APIs to access the hardware directly. Even though games run on bare metal, Nintendo would not approve their distribution if they executed ‘prohibited’ operations [43]. These included controlling the ARM7 directly or turning off the screens, for instance.
There are understandable reasons for imposing such rules. For example, to maintain a consistent player experience and enforce high quality levels. Although, in my opinion, limiting the ARM7 to I/O duties reflects a lack of trust in developers, which ultimately squandered the CPU’s potential…
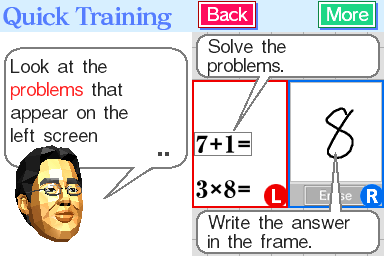
Dr Kawashima’s Brain Training (2005). New categories of games attracted audiences beyond the traditional youth circle.
On the positive side, with all the new forms of interaction available, studios had the opportunity to prioritise gameplay experience over visuals.
For the first time in consumer electronics, there were two screens, a touchscreen, a microphone, Wi-Fi connection, and a real-time clock - all packaged in the same portable console. Consequently, over the years, subsequent games presented novel forms of interaction: some required to hold the console sideways (e.g. Brain Training), others encouraged to fiddle with the hinge (e.g. Hotel Dusk), and some even used the microphone to try to teach English (English Training).
Nintendo even leveraged this wave with a new campaign called Touch Generations, aimed at offering products to an older audience.
In fact, some ‘games’ were simply standalone applications wrapped in Nintendo’s charm, like the Nintendo DS Browser, a port of Opera 8.5 [44]; or Cooking Guide: Can’t Decide What to Eat?, an interactive recipe book. Doesn’t this look familiar to the business model that upcoming smartphones (and apps) would later adopt?
Anti-Piracy and Homebrew
Even though DS cards weren’t affected by the curse of the compact disc, Trademark-based tricks were not longer enough to deter the production of Flashcarts. Thus, this time, Nintendo reinforced its traditional security with extra layers to regain control of game distribution.
Security mechanisms
To understand the new system that has been put in place, let’s take a look at each area, separately.
While the game data in the ROM still remains unencrypted, the Nintendo DS debuts a symmetric encryption system to protect the communication between the Memory Interface and the Slot-1 card.
The ‘Header’ area of the card contains a value called Gamecode, which serves as the game’s unique identifier. The Memory Interface uses this information to generate KEY1, the encryption key. Using the Blowfish encryption algorithm in combination with KEY1, the Memory Interface encrypts further commands sent to the card [45][46].
Afterwards, KEY1 is mixed with the internal clock and other values of the cartridge header to generate a new key called KEY2. The fundamental difference from KEY1 is that KEY2 incorporates randomness to make it unpredictable. Furthermore, its encryption relies on multiple XOR and shift operations to obfuscate the data [47].
KEY1 and KEY2 are used at different stages by the Slot-1 interface to encrypt its communication with the card. KEY1 is also used by the ARM7 BIOS to validate the DS card and initialise the card interface.
To put this new system into use, the BIOS includes routines that validate the Slot-1 card upon startup. This works as follows [48]:
The ARM7 BIOS retrieves the ROM chip ID of the card, saves it on RAM and then proceeds to enable KEY1 and KEY2 encryption.
The first 2 KB of the ‘Secure area’ are copied to RAM in random order. The first 8 bytes of this chunk store a string called Secure Area ID, the next values contain checksums (CRC16 type) and other metadata. All of this comes encrypted with KEY1, and the Secure Area ID is encrypted twice with KEY1 using different parameters.
The ARM7 BIOS decrypts the Secure Area ID and verifies that the result matches encryObj. If it does, the card has passed the first test. After this, the string is destroyed to prevent revealing the algorithm. If the validation fails, the 2 KB of Secure Area are filled with garbage, preventing further access to the card.
The second test involves retrieving the chip ID again. The number of reads depends on the internal clock. In the end, if the value of the chip ID matches the first chip ID stored, the second test has passed.
Finally, the rest of the Secure area is fetched in random order and reconstructed in RAM. After this, the firmware is executed.
If everything goes well, the firmware will find the required executable of the card in RAM, allowing the user to launch the game. Otherwise, the game entry will be shown greyed out.
Programs received via Download Play must be signed by Nintendo using a separate asymmetric encryption system. Specifically, RSA‑1024 combined with SHA-1 [49]. Of course, only Nintendo knows the private key.
Signature verification is performed by the system firmware, which also stores the public key.
If you were an avid DS homebrew user between 2007 and 2011, it’s very likely you came across endless catalogues of community-made software, from emulators and game ports to multimedia players, along with the many tools available to run this. The truth is, before all the easy-to-use tricks were discovered, hackers had a hard time circumventing Nintendo’s complex system.
Because the GBA subsystem still executes cartridges without any meaningful protection (aside from trademark tricks), existing GBA flashcarts remained compatible with the Nintendo DS. This enabled to run GBA homebrew, which worked fine if you didn’t mind missing out on the new functionality exclusive to DS titles.
As always, flash cartridges also enabled users to run pirated ROMs. However, since Nintendo couldn’t alter the GBA’s protection system (as doing so could potentially render existing games unusable), no extra measures were implemented.
Example of Slot-2 flashcart that can launch DS games. This requires a passthrough method to bootstrap it.
Ever since the console reached the shelves, people around the world had been conducting clandestine research in an attempt to decipher the intricacies of Slot-1, the ARM7 BIOS, and the firmware.
In January 2005, Rafael Vuijk (known as DarkFader), published a method to inject arbitrarily code in DS mode. This used an FPGA connected between the Slot-1 socket and the card pins of Metroid Prime Hunters: First Hunt[50]. In essence, Vuijk discovered that by tampering with the header values, the execution of Slot-1 could be redirected to Slot-2 (where GBA flashcarts lived). However, as the DS encryption system wasn’t yet fully understood, this required a genuine DS card to pass the initial validation checks. In any case, this model was dubbed DS Passthrough and would serve as the basis for executing Slot-2 programs in DS mode.
Subsequent months saw a proliferation of Slot-2 flashcarts appearing on the market. These new variants embedded ARM9 code that executed once bootstrapped from Slot-1. Meanwhile, the bootstrap itself was accomplished using a variety of ‘passthrough methods’ discovered over the same year, including:
PassMe: Originally designed by Natrium42[51], these were third-party Slot-1 cards that bundled integrated circuitry and a slot for a genuine Slot-1 card. They were essentially a commercialised version of Vuijk’s invention for the average user. Over time, multiple manufacturers came up with smaller and simpler revisions.
WiFiMe: Developed by Tim Schuerewegen in April 2005, this was a suite that included a modified Ralink Wi-Fi driver and a command-line utility for Windows 2000 and XP. With the use of a compatible Wi-Fi card, a PC could broadcast a customised DS program that the console could download through Download Play [52]. Once launched, it would redirect execution to Slot-2. This exploited the fact the firmware didn’t check the RSA signatures of particular areas of the binary.
FlashMe: Developed by Loopy in April 2005 [53], this addressed the inconveniences of the previous two methods. By bridging the SL1 terminal and running a specially crafted homebrew program (bootstrapped by another method), it became possible to modify the firmware so that it automatically bootstrapped Slot-2 code in DS mode.
As expected, later batches of Nintendo DS units shipped with updated firmwares that patched these tricks. Thus, hackers and manufacturers turned to exploiting deficiencies in the ARM7 BIOS (which were far more difficult to fix). This became PassMe2[54]. Even so, the cat-and-mouse continued until the next revelation delivered a major blow to Nintendo.
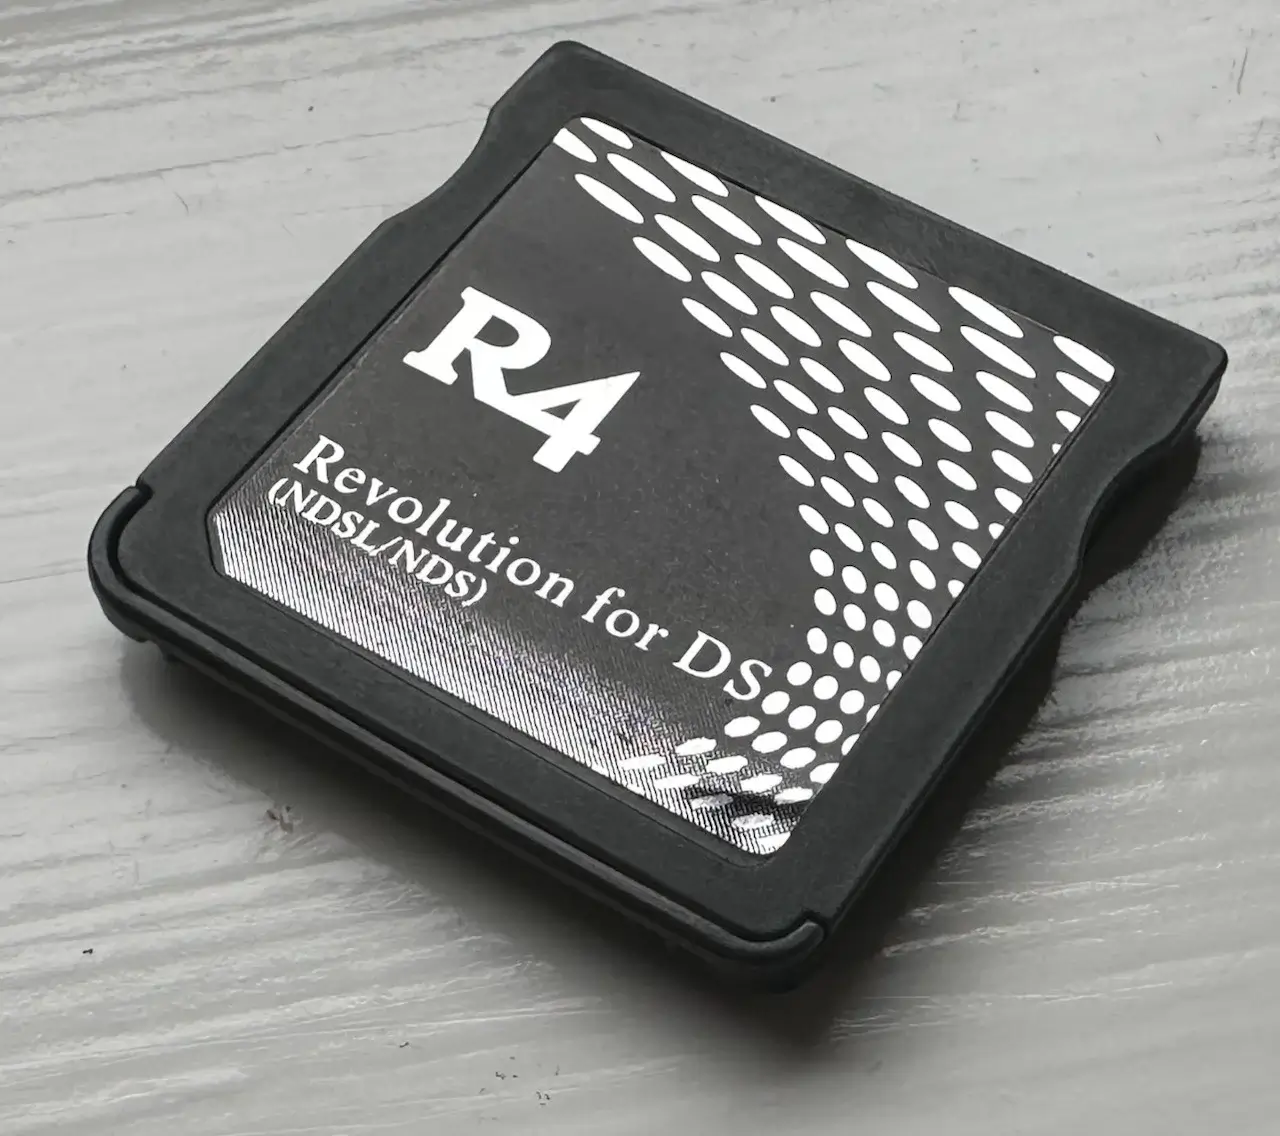
The ‘R4 DS’ was one of the first Slot-1 flashcards to reach the the market. Right afterwards, a swamp of replicas flooded it.
In January 2006, Martin Korth, developer of the Nintendo DS emulator called ‘NO$GBA’, managed to extract the ARM7 BIOS and reverse engineer the Slot-1 security system [55]. With this, new tools and documentation revealed the true mechanisms of the Nintendo DS’ security. As you have seen in this article, the encryption model is effective until the key is discovered (this is a weakness of symmetric encryption systems, unlike asymmetric encryption systems such as RSA, where the private key is kept by a separate entity).
What happened then? Well, for starters, PassMe cards were quickly replaced by NoPass cards. Their function was the same but they no longer required a genuine card inserted. The second major disruption became a new wave of plug-and-play Slot-1 flashcards, which loaded homebrew directly from Slot-1 (by including either a MicroSD socket or internal rewritable memory).
Since the encryption system couldn’t be altered without introducing breaking changes that would affect all existing retail games, Nintendo ultimately lost this battle. The only remaining option was to pursue the legal route, just like they did with their previous console.
This is my personal opinion, but it’s astonishing how simple it became to acquire and use plug-and-play flashcards compared to previous consoles. In older articles, I’ve described that if users ultimately wanted to run homebrew programs or pirated games, they would have to get down the rabbit hole and follow some cumbersome method.
In the case of the DS, however, flashcards were literally sold just like retail games (albeit with a different ‘style’ of marketing), and I bet it must have been truly concerning for game studios to see how painless was to resort to piracy.
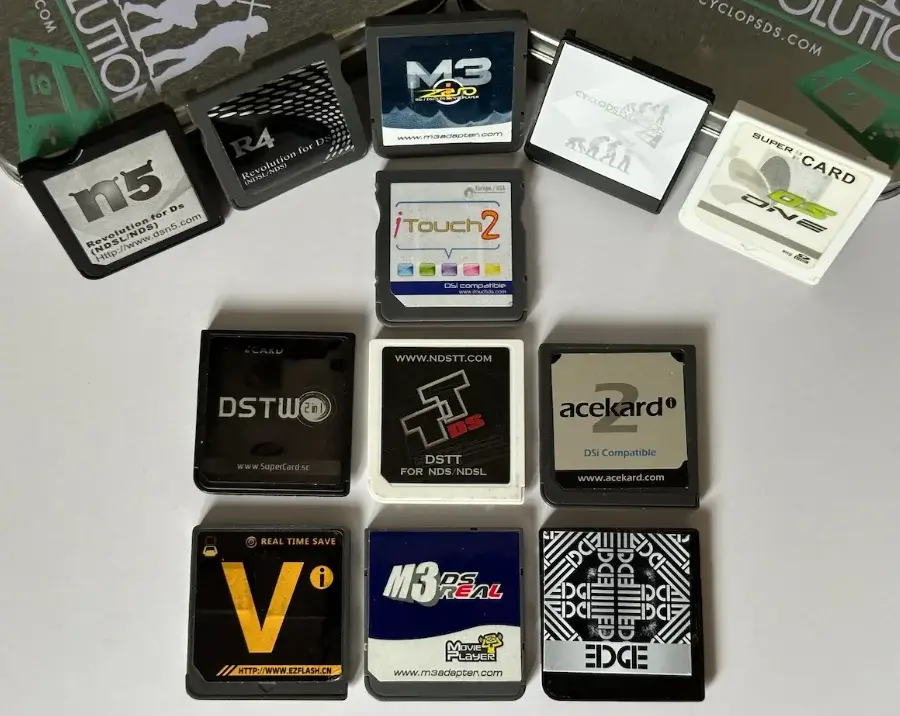
Slot-1 flashcards were a very active industry between 2007 and 2011. These are just a handful of the many offerings. Thanks annonymous donor for sending me these!
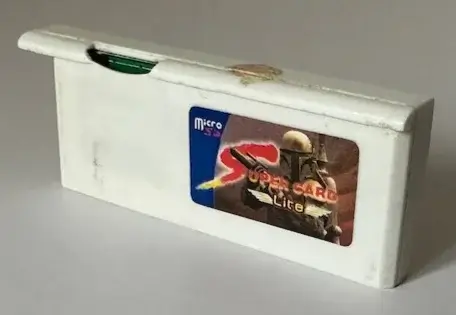
Another sticking aspect is the sheer number of branded flashcards (aside from all knock-offs) that appeared on the market. If you look at it from a technical perspective, the purpose of a flashcard is very straightforward: to redirect commands to the MicroSD card (where a game ROM or homebrew is stored) [56]. But as this industry progressed, some manufacturers took extra steps to design better software running within the flashcard (referred to as ‘kernel’ or ‘firmware’) or even integrate rather unusual hardware. For instance, the ‘N-Card’ offered embedded storage, while the ‘SuperCard DSTwo’ bundled an Ingenic Jz4740 (a MIPS-compatible CPU) running at 360 MHz! [57] I haven’t seen this level of passion since the era of expansion cartridges.
That’s all folks
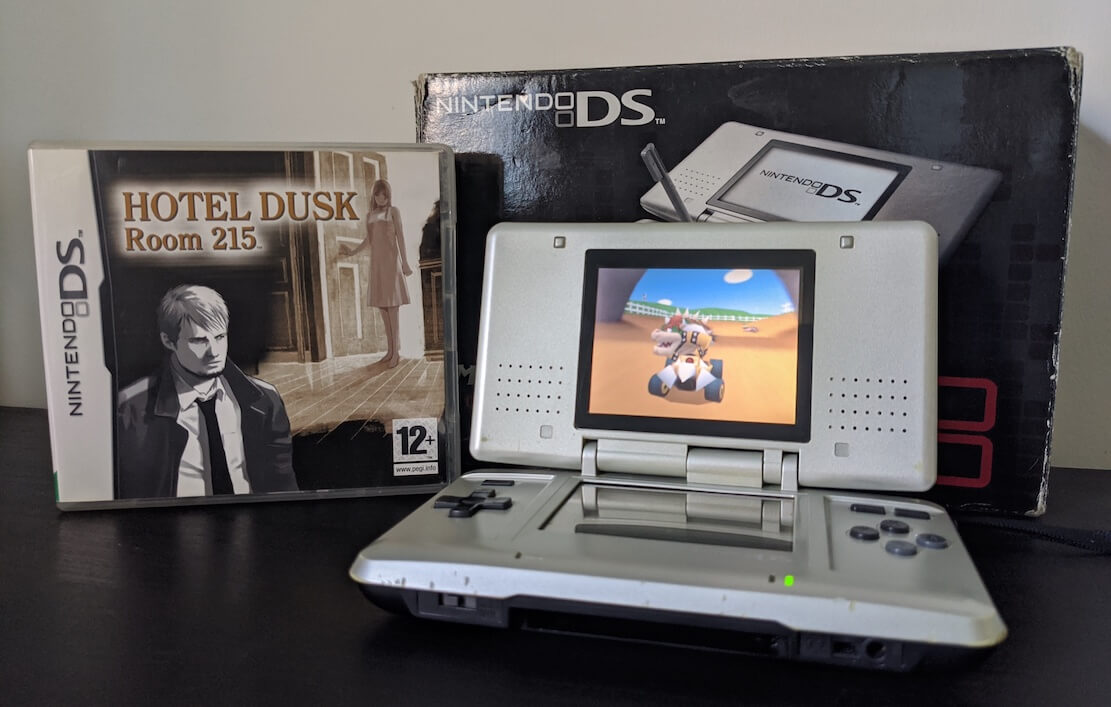
My current DS used for this study. I actually sold my first one in 2010… I wonder where it’s now.
Alrighty! I think I covered 99% of what I wanted to talk about…
I hope I didn’t sound too harsh when criticising some sections. Don’t get me wrong, I still think this console is a good piece of engineering! But there are some defects which make me wonder if it’s really a cost-effective compromise, or part of a design flaw. Truth to be told, that didn’t stop 11-year-old me from wanting one back then. So I guess that’s pretty much ‘mission accomplished’ for the company!
I would also like to thank friends and the MelonDS community for taking the time to check out the draft and pointing out lots of corrections. The Nintendo DS allowed me to mention many topics I’ve been interested in writing about for a while and I was afraid I would end up biting off more than I could chew, but hopefully you’ve enjoyed this article.
Until next time! Rodrigo
Contributing
This article is part of the Architecture of Consoles series. If you found it interesting then please consider donating. Your contribution will be used to fund the purchase of tools and resources that will help me to improve the quality of existing articles and upcoming ones.
You can also buy the book editions in English. I treat profits as donations.
Big thanks to the following people for their donation:
- Alexander Perepechko
- Chiang Yi-Ta
- Colin Szechy
- Dávid Major
- James Osborne
- Joe Pugh
- Josh Enders
- Michael Chi
- Nathan Castle
This work is licensed under a Creative Commons Attribution 4.0 International License. You may use it for your work at no cost, even for commercial purposes. But you have to respect the license and reference the article properly. Please take a look at the following guidelines and permissions:
Article information and referencing
For any referencing style, you can use the following information:
Title of article: Nintendo DS Architecture - A Practical Analysis
I only ask that you at least state the author’s name, the title of the article and the URL of the article, using any style of choice.
You don’t have to include all the information in the same place if it’s not feasible. For instance, if you use the article’s imagery in a Youtube video, you may state either the author’s name or URL of the article at the bottom of the image, and then include the complete reference in the video description. In other words, for any resource used from this website, let your viewers know where it originates from.
This is a very nice example because the channel shows this website directly and their viewers know where to find it. In fact, I was so impressed with their content and commentary that I gave them an interview 🙂.
Appreciated additions
If this article has significantly contributed to your work, I would appreciate it if you could dedicate an acknowledgement section, just like I do with the people and communities that helped me.
This is of course optional and beyond the requirements of the CC license, but I think it’s a nice detail that makes us, the random authors on the net, feel part of something bigger.
Third-party publishing
If you are interested in publishing this article on a third-party website, please get in touch.
If you have translated an article and wish to publish it on a third-party website, I tend to be open about it, but please contact me first.
It’s always nice to keep a record of changes. For a complete report, you can check the commit log. Alternatively, here’s a simplified list:
### 2026-01-28
- Overall improvements to prepare for a book release.
### 2024-10-28
- Added DS flashcards photos thanks to an anonymous donation.
### 2024-09-30
- Added DEC workstation photo taken using Christopher Rivett's collection.
### 2024-01-08
- Extended CPU section with more information about the StrongARM
- Corrected KEY1-KEY2 encryption information (see https://github.com/flipacholas/Architecture-of-consoles/issues/246), thanks @Atem2069### 2022-01-12
- Extended audio section to talk about the PSG
### 2020-08-25
- Corrected the Hotel Dusk example, it doesn't use the pressure value!
### 2020-08-24
- Added more info to the diagonal feature of the touchscreen, thanks @cosarara### 2020-08-19
- Some corrections in the anti-piracy section, thanks @shazmosushi and @dhole.
### 2020-08-12
- Released to the internets.
- Thanks #MelonDS for their contribution.
- Cheers again @dpt for checking out the early draft and helping fix the mario model.
- Carlos, letsa play mario kart.
Rodrigo Copetti
I hope you have enjoyed this article! If you want to know more about the author tap here and if you would like to support him tap here instead