This article is also published in many bookstores for the benefit of offline readers. The eBooks are DRM-free, while the printed editions compile multiple articles and feature original photography at full resolution.
You can find printed compilations here, and individual eBooks at Amazon Kindle, Apple Books, Kobo and other stores. The proceeds support the improvement of current articles and the development of new ones.
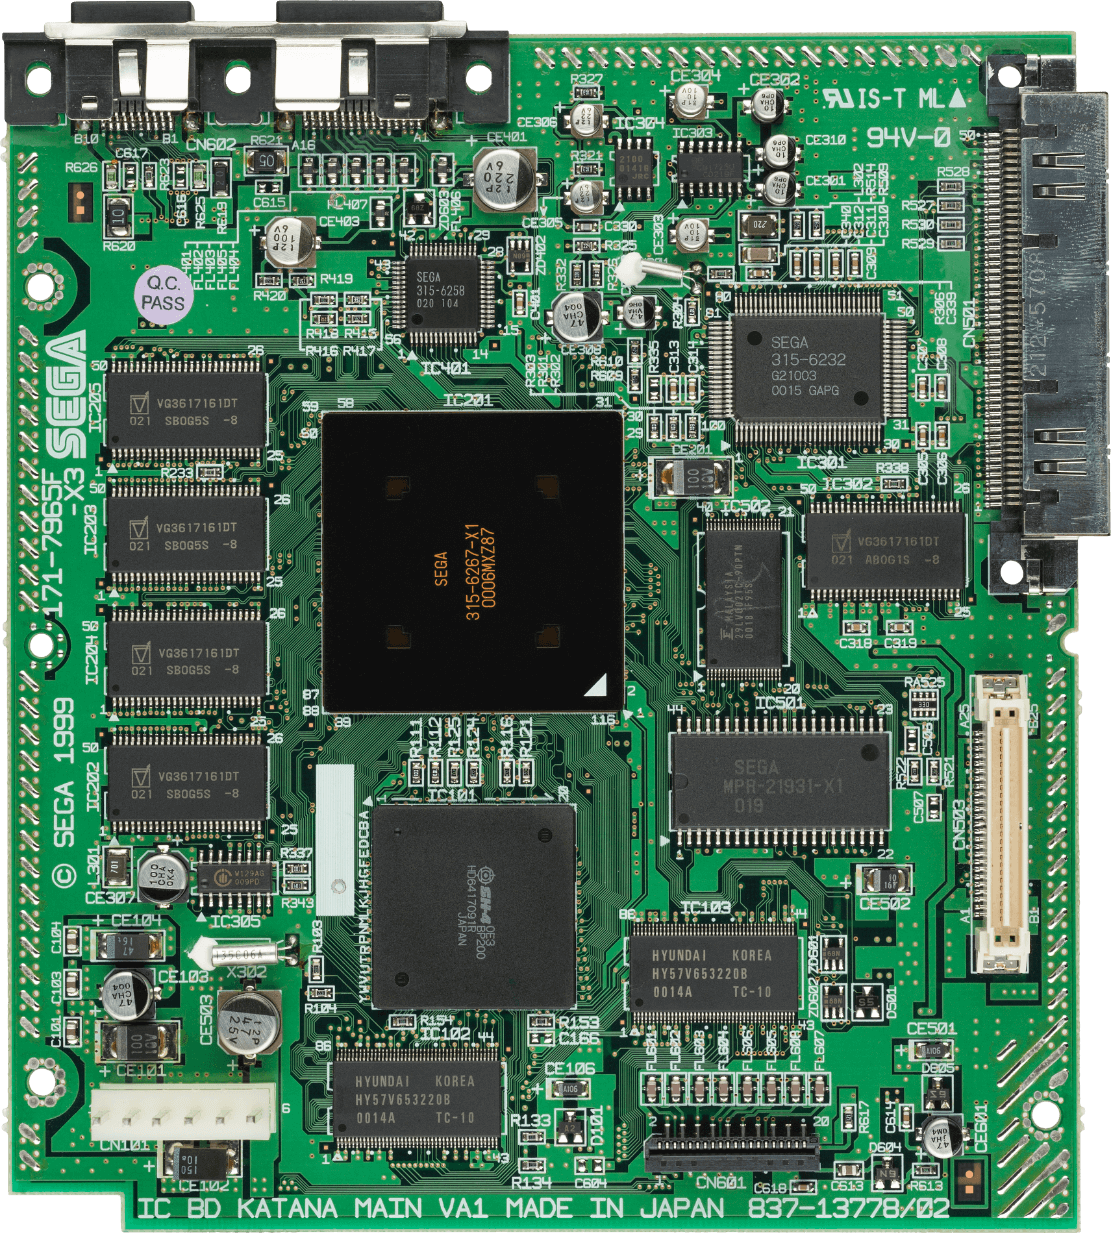
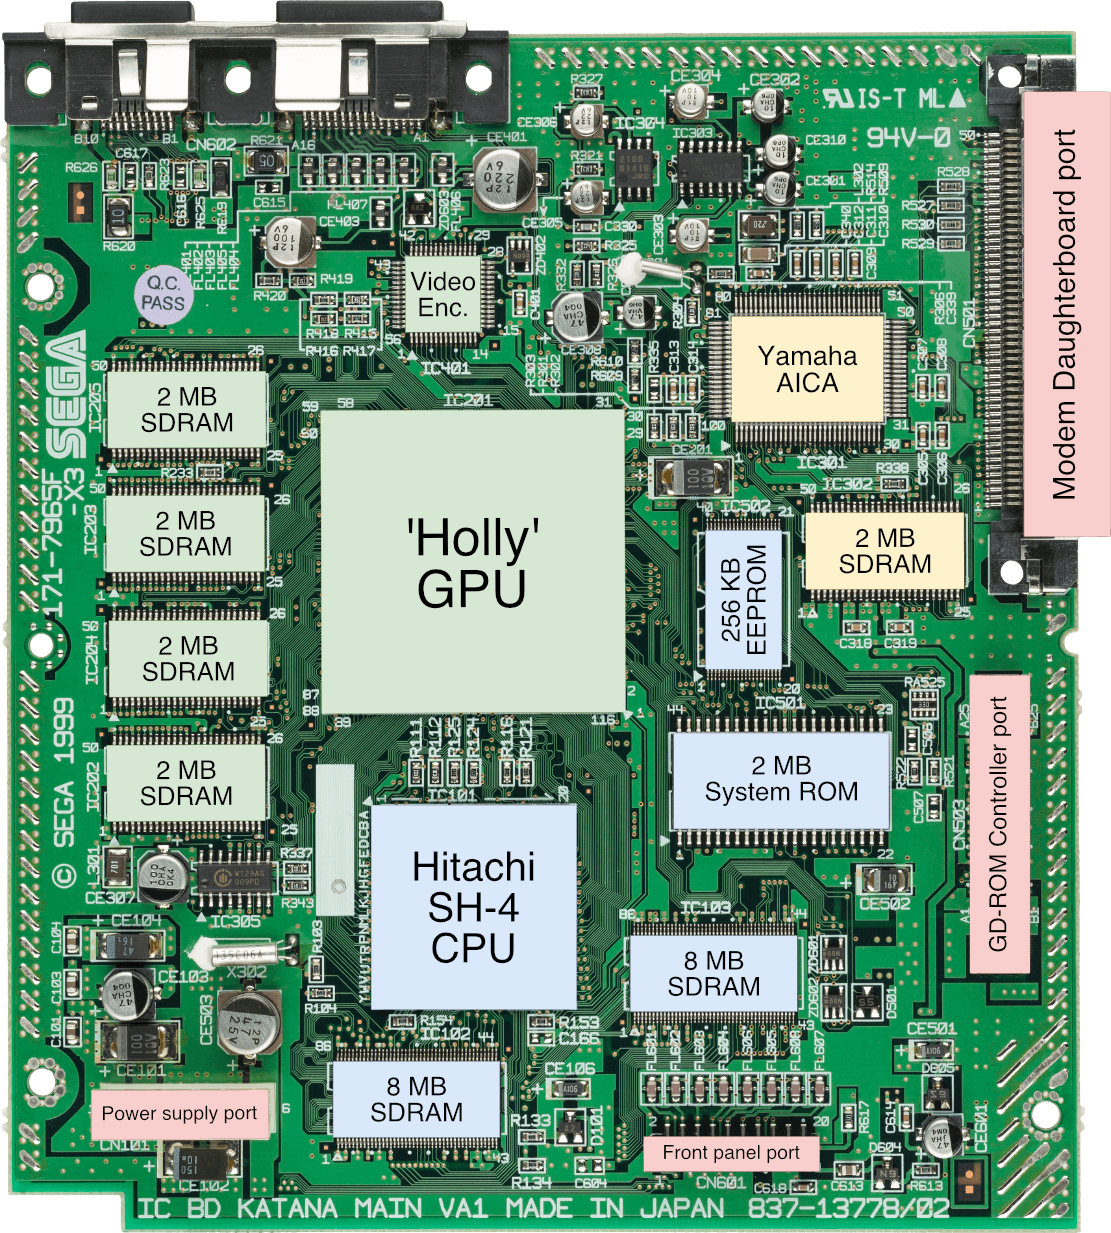
Motherboard Showing revision 'VA1'. While the official docs state that the system contains 128KB of flash memory, this motherboard happens to include a 256KB EEPROM chip for some reason instead. Battery and controller ports are found in a daughterboard called 'Front panel'.Motherboard with important parts labelled
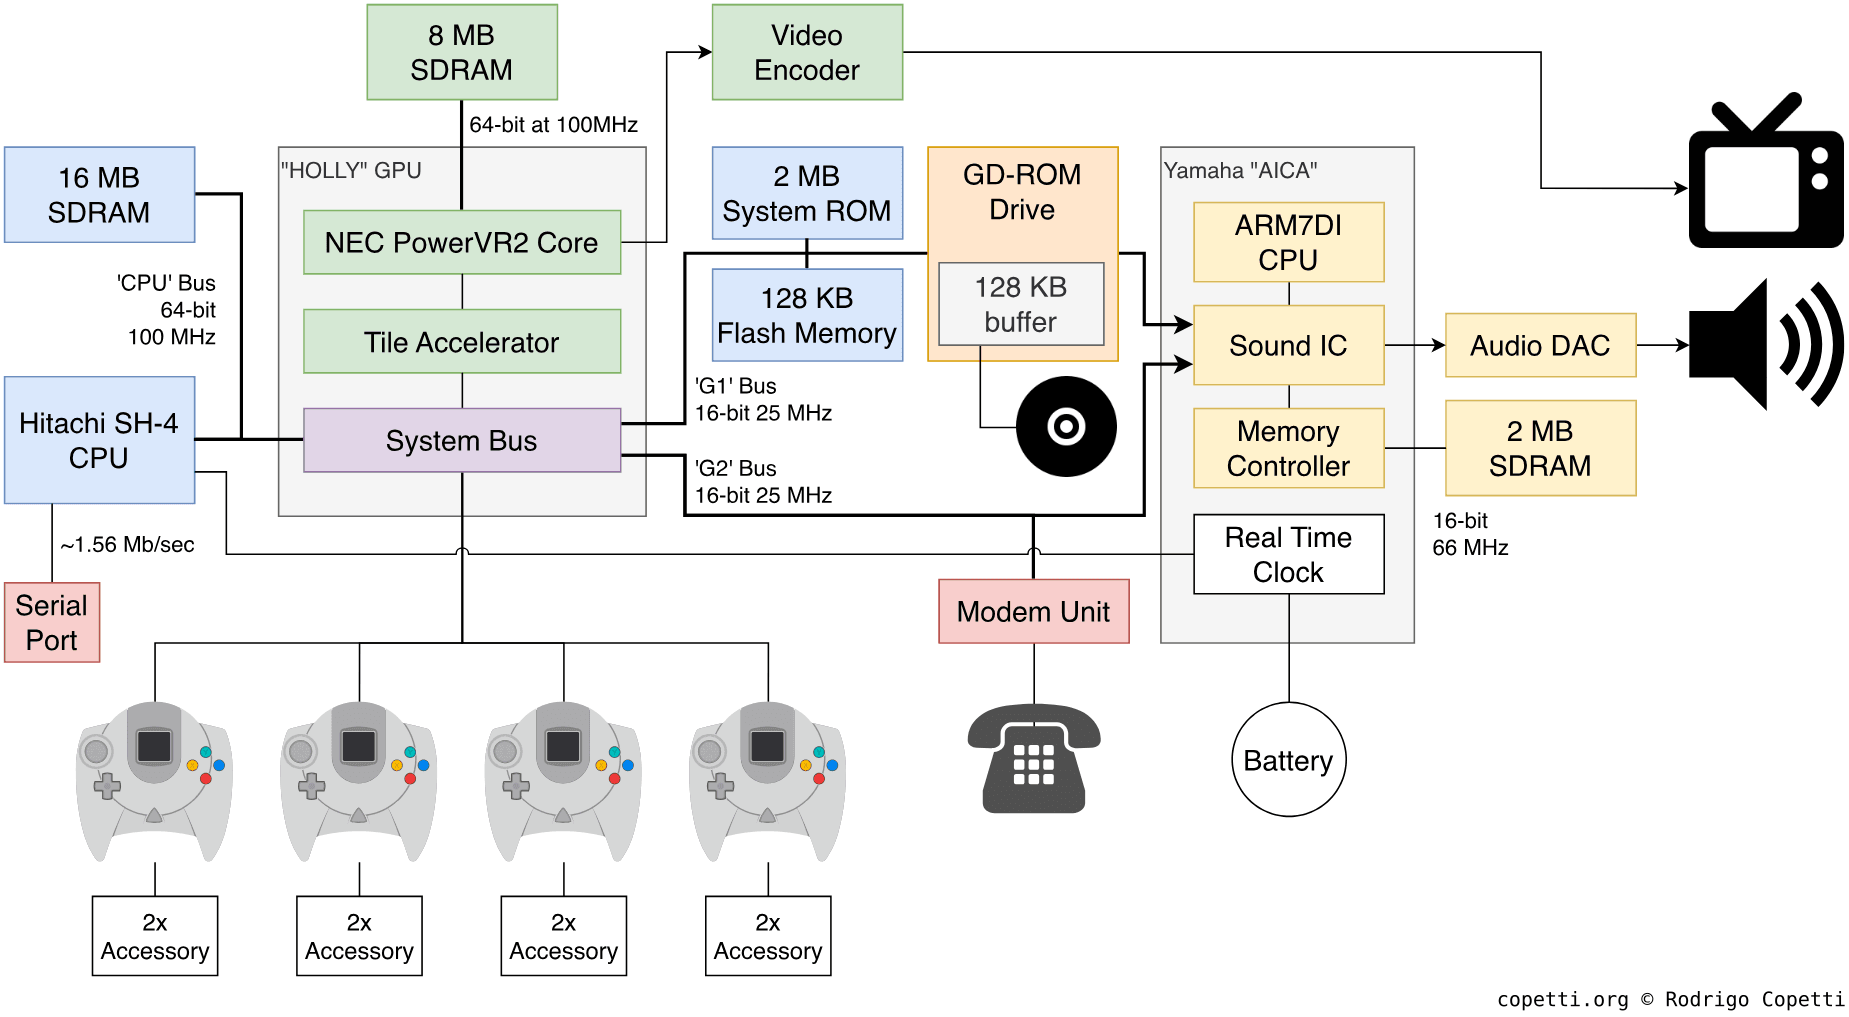
DiagramMain architecture diagram Important data buses are labelled with their width and speed.
Introduction
The Sega Dreamcast introduced many new features over its predecessor (the Saturn) to appeal to both game developers and console gamers. While this was Sega’s last attempt to conquer the console market, some of the technologies that were pioneered in the Dreamcast carried on and into future mainstream devices.
CPU
Things were progressing smoothly for Hitachi, their iconic SuperH chips had found multiple clients and the company was now ready for a fourth installment of the series. Their new entry would combine embedded capabilities with functionality enjoyed by 3D games.
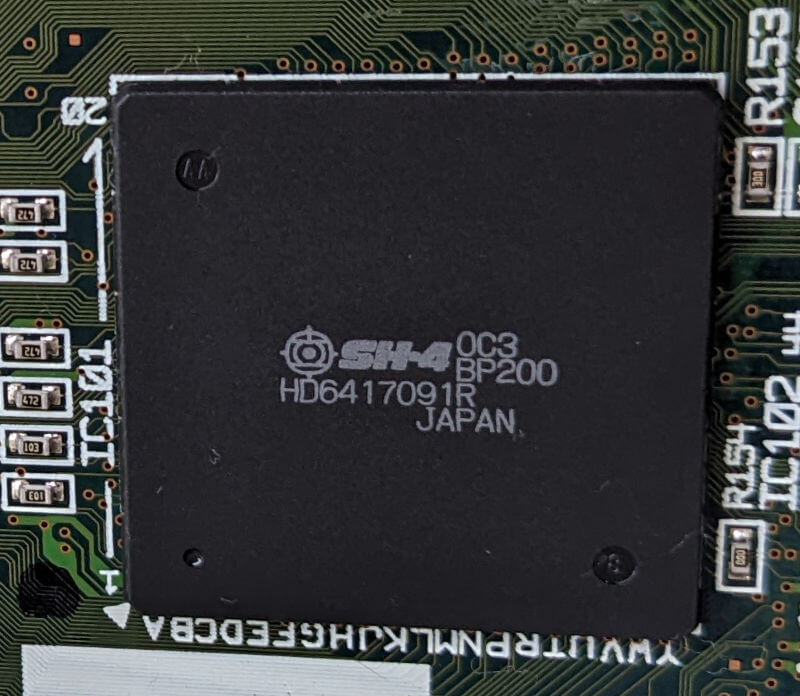
Sega, being one the early adopters of the SuperH, unsurprisingly selected Hitachi’s latest shipment to power their new console. Hence, the Dreamcast carries an SH-4 CPU running at a whopping 200 MHz[1]. Also, to make things right this time, there’s only one fully equipped CPU.
The offering
That being said, what’s interesting about this new processor?
Well, to start with, the SH-4 follows up as a superset of the previous models, meaning it inherits all the existing features of the SuperH line, including a 32-bit RISC architecture, a 5-stage pipeline and a 16-bit instruction set. Alas, it also heirs control hazards.
The SH-4 chip.
On top of that, as the next-generation CPU, it debuts many improvements that go beyond the scope of embedded applications [2]:
A 2-way superscalar pipeline: A novel parallelism technique where the CPU can process more than one instruction (two in this case) in each stage of the pipeline. This results in more instructions executed per second.
Behind the scenes, the CPU is distributing the two instructions to two different (and available) execution units. Hence - with the exception of a very small group - all instructions have to be of different types (i.e. branching, arithmetic, etc) to be parallelised [3]. Otherwise, they can only be executed sequentially. Be as it may, the SH-4 also exhibits a subset of instructions that can never be parallelised, as they contain too many dependencies to make it feasible.
8 KB instruction cache and 16 KB data cache: This ratio is rather curious since consoles tend to include more instruction cache than data cache. However, the SH-4 allows the data cache to be split into two sections: 8 KB of Scratchpad (fast RAM) and 8 KB of data cache.
Special work
The common chores of a game console CPU include handling the game’s logic, running the enemy AI and keeping the GPU fed with drawing tasks.
With the Dreamcast, you will see that the GPU only covers the tasks of a rasteriser. So, the CPU must get involved with the majority of the graphics pipeline. This means the CPU will be processing vast amounts of geometry data (such as computing perspective transformations). Now, to make sure the CPU can sustain this role, Sega and Hitachi collaborated to incorporate two crucial extras into the SH-4.
The first addition is a dedicated 64-bit Floating-Point Unit (FPU). This component computes 32-bit decimal numbers (the so-called ‘single-precision’ or ‘floats’) or 64-bit ones (the ‘double-precision’ or ‘doubles’ type) abiding by the IEEE-754 standard. Its register file is made of thirty-two 32-bit registers, but they can also be combined into a different group of sixteen 64-bit registers, this is what enables the unit to operate doubles.
If that wasn’t enough, Hitachi took a step forward with the FPU and implemented extra logic to form another register group, this time made of eight 128-bit registers. In it, each register now stores four 32-bit floats or, in other words, 128-bit vectors. This format is optimal for graphics-related operations.
To make good use of the new vectors, the FPU includes specialised instructions for operating them, much like what the Saturn Control Unit provided, except the industry is now a bit more standardised. The new instructions constitute what is often known as Single Instruction Multiple Data (SIMD) and may perform the following algebraic operations:
Dot product.
The sum of squares.
Matrix multiplication.
The second addition is the SH-4’s external bus, which is now 64-bit wide, enabling the CPU to transfer pairs of 32-bit values at the same time. This is another improvement that adds up to the overall performance of this CPU.
Memory & access
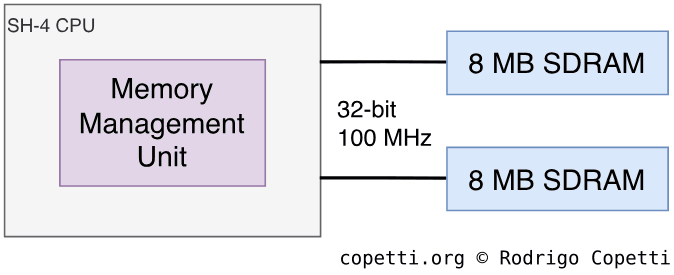
The Dreamcasts houses 16 MB of SDRAM, and it’s directly connected to the CPU using a 100 MHz bus (half the CPU speed).
Conversely, the memory’s data bus is only 32-bit wide [4]. Does this mean the CPU’s shiny 64-bit bus is wasted? No, because the RAM is installed using two 8 MB banks. So, each chip is connected to half of the CPU’s bus lines.
Memory diagram.
To access this memory, the CPU includes a dedicated Memory Management Unit or ‘MMU’ for virtual addressing, this is helpful since the physical memory address space of this CPU happens to be 29 bits wide. Additionally, thanks to the incorporation of four Translation Lookaside Buffers (TLBs), programmers can use 32-bit addresses without hitting performance penalties.
Now, since only 29 bits are needed for addressing, the extra three bits control memory protection, alternating the memory map and circumventing the cache, respectively [5][6].
Ultimately, programmers decide whether to use these features or not. Games for this system certainly don’t require memory protection and the MMU must be manually enabled at boot.
No UMA but…
While this system is not designed around the strict Unified Memory Architecture like a well-known competitor, it does delegate I/O access to the GPU. That means that if the CPU has to fetch anything that’s beyond its dedicated RAM or a serial interface (which is also connected), it will have to request the GPU and wait if necessary.
This CPU also features a unique functionality called Parallel I/O or ‘PIO’ that is used to manipulate multiple I/O locations at the same time. Sega wired up these pins so the CPU can manipulate the GPU’s video mode (more details are explained in the ‘Graphics’ section).
End of the line
Even after all the advantages described, I’m afraid the SuperH series didn’t progress significantly after its last major user, the Dreamcast, left the stores. After the popularity of the SH-4, Hitachi (or Renesas Electronics, the current owners) haven’t been able to replicate the same level of success, and considering the embedded/handheld market has since favoured ARM (thanks to StrongARM), I don’t see Renesas continuing Hitachi’s invention anytime soon.
The good thing about computing, however, is that technological progress tends to spread beyond the boundaries of brands and companies. For instance, the SH’s compressed instruction technique has carried on with ARM’s Thumb mode (a secondary 16-bit ISA) [7]. Furthermore, in 2012, a volunteer-driven project was started to produce a modern SuperH-compatible CPU, called the ‘J2’ [8].
Graphics
The GPU package is a custom-made chip called Holly running at 100 MHz. Unlike previous in-house designs, Sega now partnered with VideoLogic (now known as Imagination Technologies) to provide them with a competitive 3D accelerator.
The Holly chip (after removing the thermal pads) and the video encoder.
Inside Holly, we can find VideoLogic’s exclusive graphics circuit called PowerVR2 (also referred to as ‘PowerVR Series2’ and ‘CLX2’), it’s based on their previous PowerVR GPUs but tailored for the Dreamcast.
Architecture
VideoLogic chose an alternative approach for the construction of their 3D engine called Tile-Based Deferred Rendering (TBDR).
Instead of rendering a whole frame at once (as traditional Immediate Mode Renderers or ‘IMR’ do [9]), TBDR divides the rendering area into multiple sections called ‘tiles’. Then, it carries out the rendering process on each tile individually and the result is combined to form the final frame [10].
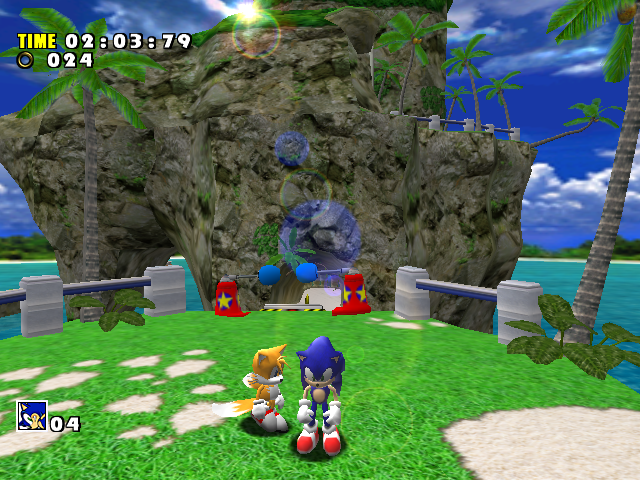
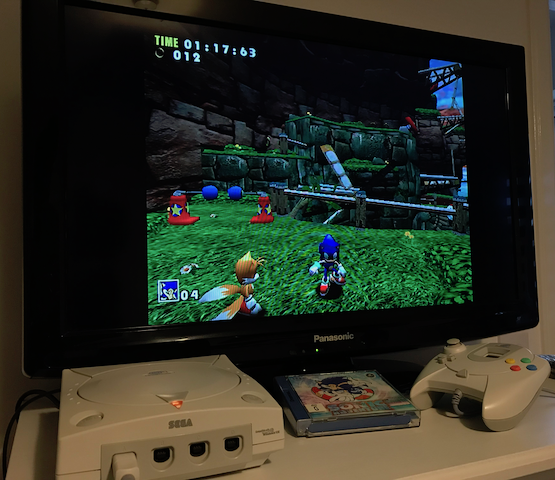
Sonic Adventure (1999).
This innovative design brings interesting advantages:
It can be greatly parallelised, which significantly reduces bandwidth and power usage.
It implements a clever solution to the visibility problem by automatically sorting the polygons from front to back and then performing z-tests at the first stages of the pipeline. The combination of these tasks not only solves the original issue, but also prevents overdraw (rasterisation of hidden polygons) which wastes resources and degrades performance.
It’s no surprise that Imagination took this efficient technology forward to build the Series 4 PowerVR cores which powered an incredible number of devices, including the first generation of iPhone, the iPhone 3G, the Nokia N95 and the Dell Axim x51.
Construction
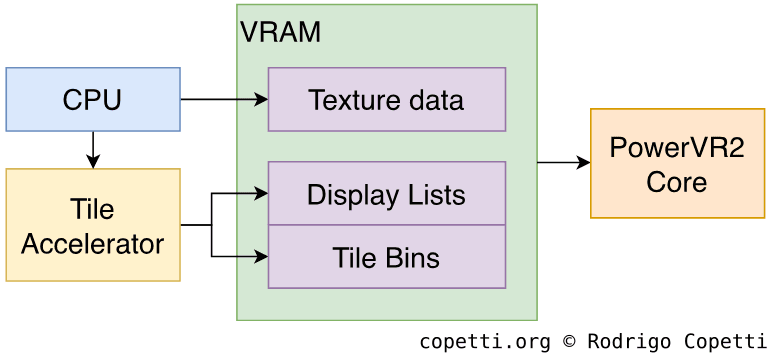
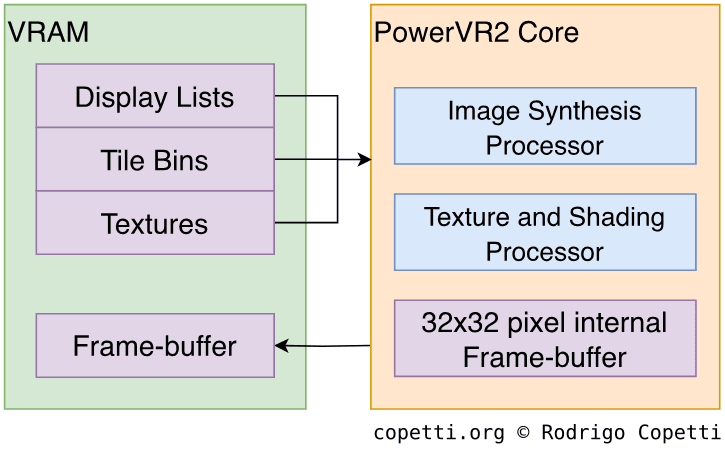
Let’s take a look at the two main components of the Dreamcast’s GPU [11]:
Before the rendering process starts, a component known as the Tile Accelerator performs pre-processing. It starts by allocating several 32x32 tile bins into which the geometry will be rendered.
Then, the Tile Accelerator will:
Grab the geometry data and drawing commands issued by the CPU (either using DMA or traditional transfers).
Convert this data into an internal format.
Distribute the geometry to each bin based on its coordinates. Clipped geometry will be discarded as well.
Generate the resulting Display Lists.
These Display Lists are then interpreted by the 3D engine: The PowerVR2.
Here is where the graphics are brought to life, the Display Lists received from the TA tell the core to render the geometry of a single tile using an internal frame-buffer. The process is as follows:
The Image Synthesis Processor or ‘ISP’ fetches the primitives (either triangles or quads) and performs Hidden-Surface Removal to remove unseen polygons. Then, after calculating its Z-buffers and stencil buffers, the data goes through Depth Testing to avoid rendering polygons that would appear behind others and Stencil Tests to cull geometry that won’t be visible if they are located behind a 2D polygon (also called Mask).
Notice how these tests are effectively carried out at the start of the pipeline. In contrast, previous consoles using late z-buffering discard the geometry at the end of the pipeline. The ISP approach prevents processing the geometry that will eventually be discarded [12], thereby saving resources.
The Texture and Shading Processor or ‘TSP’ applies colouring, shading, and multiple effects over the tile area.
Textures are not applied until the tile is exported, meaning that emerging overdraw (if any) will not lower the fill rate.
After the operation is completed, the rendered tile is written to the main frame-buffer in VRAM. This process is repeated until all tiles are finished. Once complete, the resulting frame-buffer is picked by the Video encoder and sent through the video signal.
Apart from the clear architectural difference, the Texture and Shading Processor comes with many capabilities that give one an idea of how distant this console is from the old Saturn. Here are some notable examples:
Alpha blending: Combines colours of overlapping layers to achieve transparency effects.
The process used for applying transparency in this system is called order-independent transparency. The algorithm automatically sorts the primitives before blending their colours, and while this slows down the rendering process, it avoids relying on the game itself to do all the sorting manually. For this reason, Dreamcast games excelled in displaying transparent objects.
Combined with the tile-based system, order-independent transparency completely addresses previous mishaps.
Mip-Mapping: Automatically selects a scaled-down version of the texture depending on the level of detail required. This is done to prevent processing large textures that would be seen far away from the camera (which would be a waste of processing power and produce aliasing).
Environment mapping: Applies reflections on textures.
Bilinear, Trilinear and anisotropic filtering: These are different algorithms used to smooth the textures and prevent pixelation. They are ordered from ‘worst’ to ‘best’, where the resulting quality of each one is directly proportional to the amount of computation required.
This is a huge step up from the Saturn since the former didn’t provide any texture filter!
Bump mapping: Simulates defects on surfaces without spending extra polygons.
Gaining detail
Holly can now draw ~10 times more polygons than its predecessor, here’s a Before & After example that shows how model designs are not that limited anymore. Try to fiddle with them!
Wireframe
Surface
Textured
Tap to enable interaction
Sonic R (1997) for the Saturn. 286 triangles (or 185 quadrilaterals).
Wireframe
Surface
Textured
Tap to enable interaction
Sonic Adventure (1999) for the Dreamcast. 1001 triangles.
Video Modes
The video system was designed to support multiple types of screens and formats, thus the video encoder outputs to a single-shaped socket that supports the following type of signals:
Composite: Combines the three signals needed to display video (chroma, luma and sync) into a single one, requiring only a single-pin cable.
This is used on old PAL and NTSC TVs with an RCA connection.
S-Video: Combines luma and sync while keeping chroma separated (two video lines in total).
RGB: Sends separate Red-Green-Blue signals and provides different sync types to choose from (composite sync or extracted from video composite or S-Video).
A SCART cable will use this type.
VGA: Combines RGB with two sync signals (horizontal and vertical) resulting in five video lines in total. This enables the display of the largest resolution possible (720x480) in progressive mode (thus, this mode is often named ‘480p’). VGA has actually been the standard format/medium used by computer monitors for some time.
To use this type, Sega provided a VGA adapter as an extra accessory.
Now, the Dreamcast can’t encode all of these at the same time, so the GPU and the Audio processor contain a register called Image Mode that coordinates which video/audio buses will be activated to generate the requested signal. The CPU detects the type of cable inserted (by checking which ‘select bits’ of the video connector are active) and writes the required values on the GPU. Finally, the values are forwarded to the Audio processor.
Since VGA is strictly a progressive type of signal (as opposed to the traditional interlaced), some compatibility issues arose with games that were only designed for interlaced video. These explicitly state in their code that the game won’t display on VGA, so the CPU will block the game until the user swaps out the VGA cable for another type.
Audio
The Audio functionality is handled by a custom chip called AICA made by Yamaha, it’s an improved version of the SCSP used in the Saturn and is composed of four components:
The Sound Integrated Circuit or ‘IC’: A set of modules (synthesiser, DSP and mixer) that generates the audio signal and applies effects on it. It supports up to 64 PCM channels with a resolution of 16 or 8 bits and a sampling rate of 44.1 kHz. Overall, this is the optimal quality for playing audio.
Additionally, it includes an ADPCM decoder to offload some work from the CPU.
Curiously enough, it also provides two MIDI pins to connect a MIDI instrument, although this is meant to be used during development.
2 MB of SDRAM: Stores sound data and programs. It’s filled by the main CPU using DMA.
An ARM7DI running at ~2.82 MHz: Controls the Sound IC. This CPU is programmed by booting a small software (called driver) stored in SRAM which interprets the audio data and manipulates the Sound IC accordingly.
If you wonder, a similar but beefier CPU is also found in the Game Boy Advance.
Memory Controller: Interfaces the 2 MB of SDRAM.
To help with development, the official SDK included multiple sound drivers for different needs (sequencing, decoding, etc).
Evolution
We’ve come so far since the days of the Mega Drive/Genesis, in order to show how much progress was made in sound synthesis, here’s an example of two games, one for the Mega Drive and the other for the Dreamcast, that used the same composition:
Sonic 3D Blast (1996) for the Mega Drive / Genesis. The predecessor performs FM synthesis to generate audio signals on the fly.Sonic Adventure (1999) for the Dreamcast. The new audio subsystem processes PCM samples without any hassle.
You can also try this widget if you want to switch between the two while playing the score:
MegaDrive / Genesis
Dreamcast
Tap to enable interaction
MegaDrive / Genesis: Sonic 3D Blast (1996). Dreamcast: Sonic Adventure (1999).
Explanation
Instead of programming an FM chip, the composers of Sonic Adventure produced their soundtrack in-house and then encoded it to ‘ADX’, a lossy format developed by CRI Middleware. Hence, it only uses two of the 64 PCM channels (stereo).
ADX compression enables the game to decode and stream the data from the GD-ROM to the Sound IC without running out of memory or bandwidth. Furthermore, the respective driver could be implemented in many ways, as there were multiple approaches available to balance the workload of the main CPU and ARM7.
Staying alive
Somehow, this chip is also responsible for providing a Real Time Clock (RTC) to the BIOS, it’s also connected to a clock battery to continue working without AC power.
Operating System
There are 2 MB of ‘System ROM’ that stores a BIOS. This is the first location the CPU reads from when starting up. The ROM contains code that instructs the CPU to either bootstrap the game or show the shell.
Furthermore, the BIOS also contains routines that games may use to simplify I/O functions [13], like reading from the GD-ROM drive.
Interactive shell
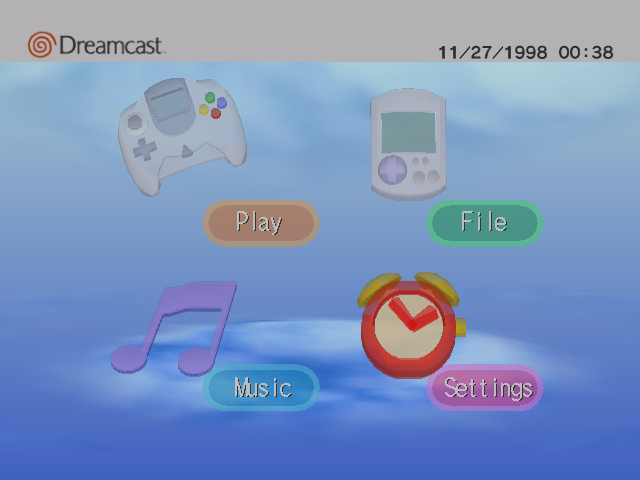
Much like the Sega Saturn, if there isn’t a valid game disc inserted, the console will launch a visual shell.
Shell after booting without a disc.
The shell contains a simple graphical user interface to enable the user to perform basic but necessary tasks like:
Start the game, if it hasn’t already.
Manipulate the save data stored in the VMU (more details about this device are explained later).
Play music, if there’s an Audio CD inserted.
Change certain settings like date, time, sound and so forth.
Windows CE
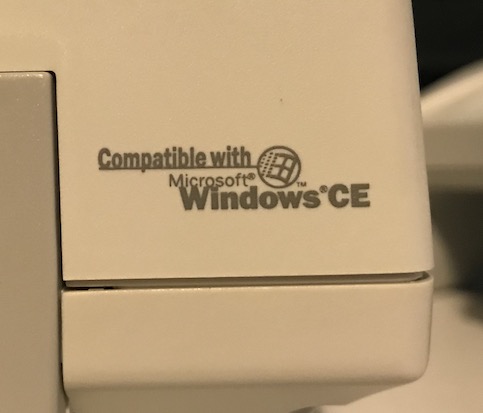
Ever since the Dreamcast’s announcement, it was said that the console could run Windows CE. In fact, you only have to look at the console’s front case to notice a stamp by Microsoft… What’s going on here?
The Windows CE seal on the front of the console. Coincidentally, you may find similar labels on other handheld equipment from the same era.
First things first, what exactly is ‘Windows CE’? Well, it’s just one of the many projects Microsoft embarked on during the mid-90s to conquer territories beyond the conventional PC market. In the wake of more efficient CPU architectures than x86 and the emergence of handheld computing, a new team at Microsoft was tasked with bringing the Windows ecosystem into those new devices [14].
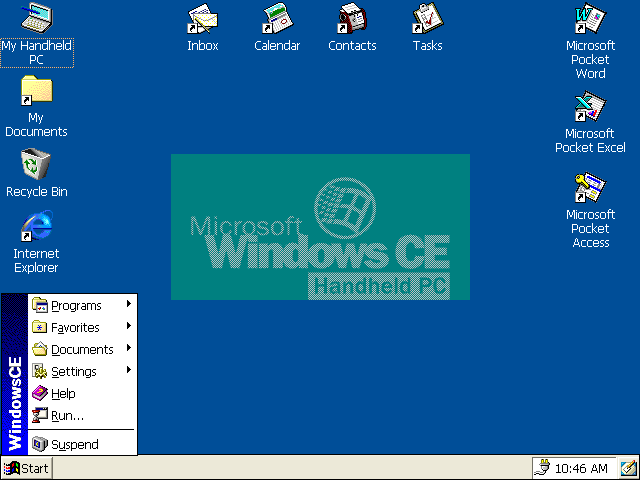
This led to the creation of Windows CE: a complete operating system, developed from the ground up, that provided a subset of the existing Windows APIs, development tools and services.
Windows CE 3.0 (2000), bundled with a desktop and a couple of business apps.
Unlike Windows 95 or NT, the new system presented the following advantages:
It ran on a wide range of CPU architectures [15], including the SuperH and even the NEC/MIPS VR4300 (used by the Nintendo 64).
It was designed with constrained hardware in mind, such as a limited power source (AA batteries), memory (2 MB RAM) and storage (4 MB ROM).
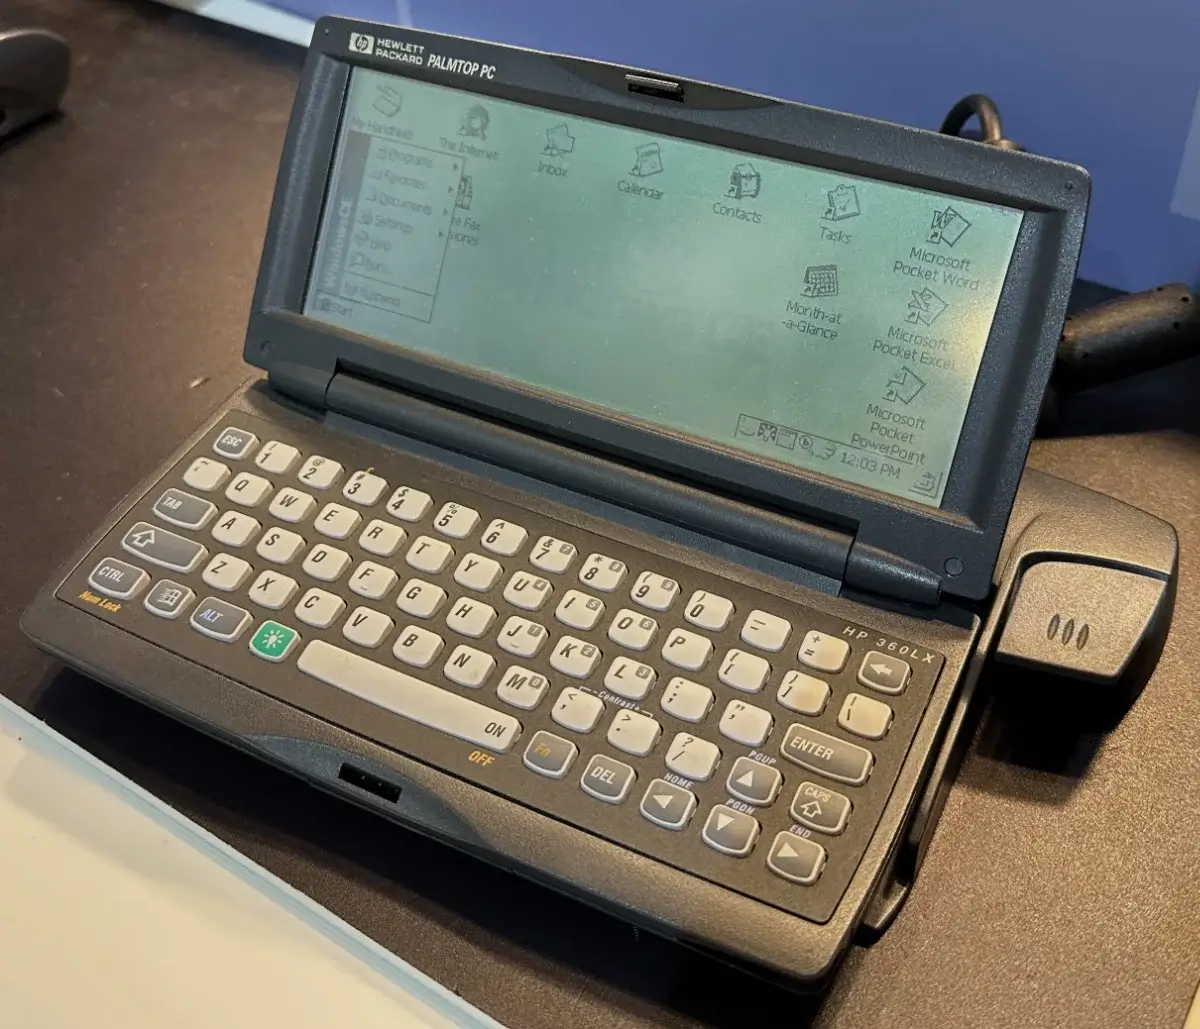
An HP Palmtop PC 360LX (1997) running Windows CE 2.0. I found it lying at The Centre for Computing History (Cambridge, UK) when I visited in August 2024. Coincidentally, this Palmtop houses an SH-3 CPU!
Moreover, Windows CE was sold as a set of building blocks for manufacturers, allowing them to cherry-pick which components to bundle. Manufacturers could then integrate it into a variety of hardware (such as handhelds, point-of-sale terminals or even automotive systems). Nevertheless, Windows CE gained significant notice as the OS powering Palmtops (the precursor of PDAs), effectively competing against the Apple Newton and Palm.
As the cellphone industry surged throughout the late 90s, Microsoft made use of Windows CE’s modularity to build PocketPC, another operating system (later known as ‘Windows Mobile’) entirely focused on PDAs and phones.
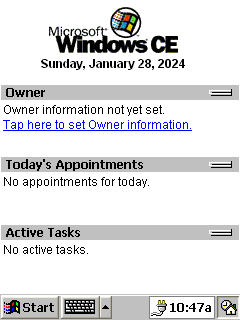
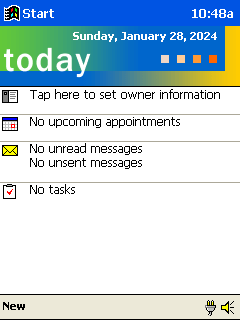
Windows CE 2.11 ‘Palm-size PC Edition’ 1.2 (1999)PocketPC (2000), based on Windows CE 3.Microsoft’s attempts to push Windows CE into the PDA market.
Now, what does all of this have to do with the Dreamcast? At some point in time, Microsoft and Sega ventured the idea of producing a Windows CE package for the Dreamcast [16]. After all, Windows CE was already running on top of Hitachi’s CPUs. In the end, this didn’t materialise in a full desktop interface or integration with Microsoft’s online services. Instead, it served as an optional layer of abstraction to simplify hardware operations.
Similar to what Nintendo provided with the Nintendo 64, Microsoft shipped an SDK (commonly referred to as Dragon SDK), based on Windows CE, to program applications for the Sega Dreamcast. The libraries comprised a subset of CE with the minimal components needed to assist with graphics, audio and debugging. As part of ‘joining the Microsoft club’, developers could now make use of Microsoft’s star IDE (Visual Studio 6.0) and Visual C++ 6.0 for development.
Some developers found this option very attractive. Since the audio/graphics framework included with CE was none other than DirectX 6, plenty of PC games could, in theory, be easily ported to the Dreamcast. However, the architectural differences between the Dreamcast and the conventional PC were too great to ignore. So, in the end, programmers had to go through great deals of optimisation to reach optimal performance [17]. Furthermore, since the Dreamcast’s BIOS didn’t bundle any of Microsoft’s frameworks, the SDK had to be statically linked to the game. Thus, compared to Sega’s closer-to-metal libraries, Dragon SDK increased the game’s loading times (after all, a separate ‘OS’ had to be loaded from the game disc) and, throughout the game’s execution, the Windows CE layer happened to eat a substantial amount of resources.
In conclusion, ‘Windows CE for Dreamcast’ was just a secondary SDK of choice for developers. Nonetheless, a considerable number of Dreamcast games ended up making use of it.
If you’re curious about the fate of Windows CE and Windows Mobile, things didn’t go particularly well for Microsoft in the handheld market. Windows CE was abandoned in 2013. The year before, the CE-based core of Windows Mobile was replaced with Windows NT (aligning with the desktop-based Windows 8). Nevertheless, Windows Mobile eventually accepted defeat against newer platforms (Android and iOS) and was discontinued in 2019.
I/O
The GPU also includes another module for handling most of the I/O called System Bus. It provides the following interfaces:
The G1 interface: Where the BIOS ROM along with its saved configuration and the GD-ROM content can be accessed.
The G2 interface: Provides access to the Modem and Sound Controller.
The Maple interface: Transfers chunks of data between the controllers (along with the accessories connected to them) and the CPU. It’s a serial bus and provides a dedicated DMA.
The SH-4 interface: Connects the main CPU for general-purpose communications.
The DDT interface: Takes control of the CPU bus to access its main memory during DMA transfers.
The PVR interface: Connects the CPU with the Tile Accelerator using a dedicated DMA.
Games
Development was mainly done in C or C++. At first, C was the recommended choice since the available C++ compilers were initially very limited in functionality (and quality).
Sega also provided development hardware in the form of a PC-like tower called the Sega Katana Development Box. This houses Dreamcast hardware with enhanced I/O for development. It also shipped with a CD containing the official Katana SDK to be installed on a Windows 98 PC.
As mentioned before, developers also had the choice of adopting Microsoft’s Dragon SDK on top of Sega’s. In that case, DirectX 6.0 and Visual C++ 6.0 would be available.
Medium
Games are stored in GD-ROMs, which are just CD-ROMs with a higher density of pits (reaching a gigabyte of capacity). The speed is 12x, which is not too shabby compared to Saturn’s 2x CD reader.
Online platform
The Dreamcast shipped with a modem module installed which games could use to ‘call’ a dial-up service for online gaming. Sega provided two services: SegaNet (used in America and Japan) and Dreamarena (the European counterpart).
Players registered with a service using DreamKey, an extra disc that was bundled with some games. DreamKey provided a web browser to register an account. Initially, DreamKey came as a pre-configured service depending on the region, but later revisions allowed users to alter its ISP settings to connect to any of them.
There was also a Dreamcast-branded keyboard and mouse available to buy, just in case the user fancied surfing the net PC-style.
Unfortunately, SegaNet and Dreamarena were discontinued two years after launch. Thus, games that exclusively relied on them became unusable, unless such services are emulated using extra tools (like the DreamPi, a Raspberry Pi image that replicates them with the help of servers maintained by a community of users).
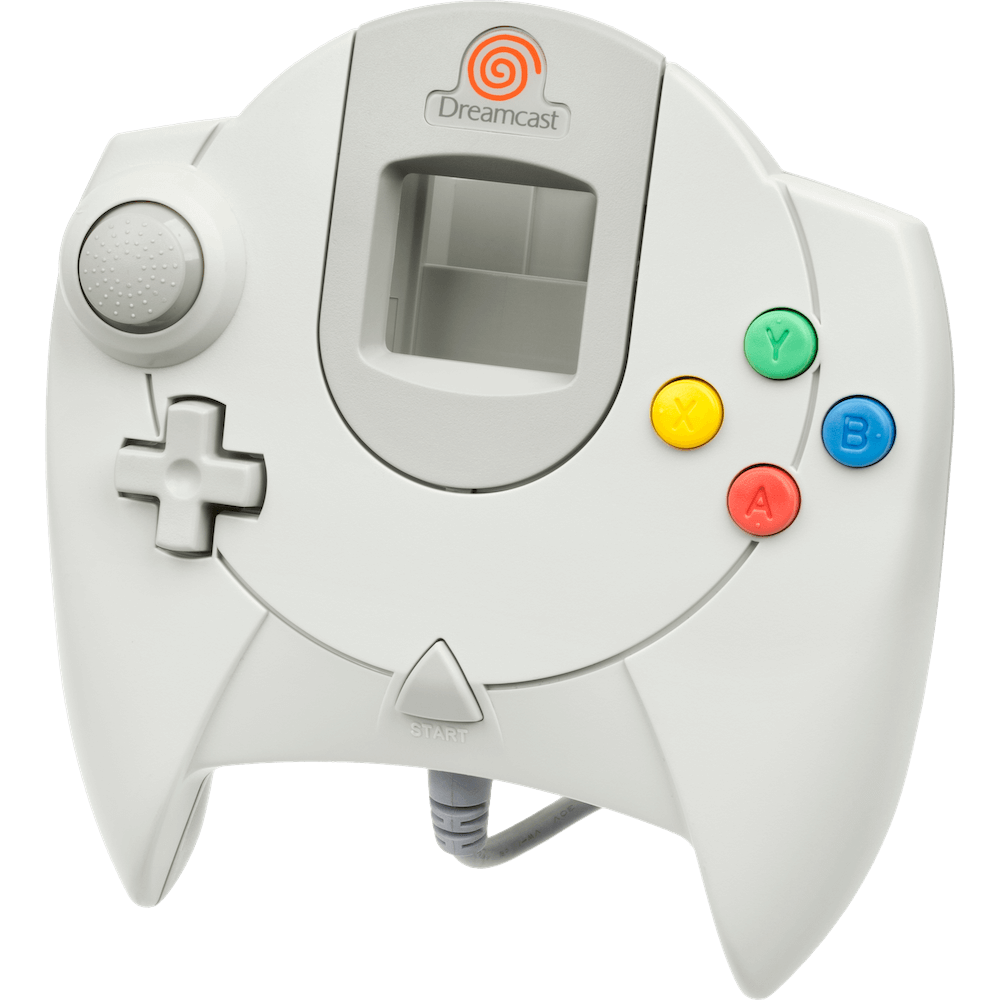
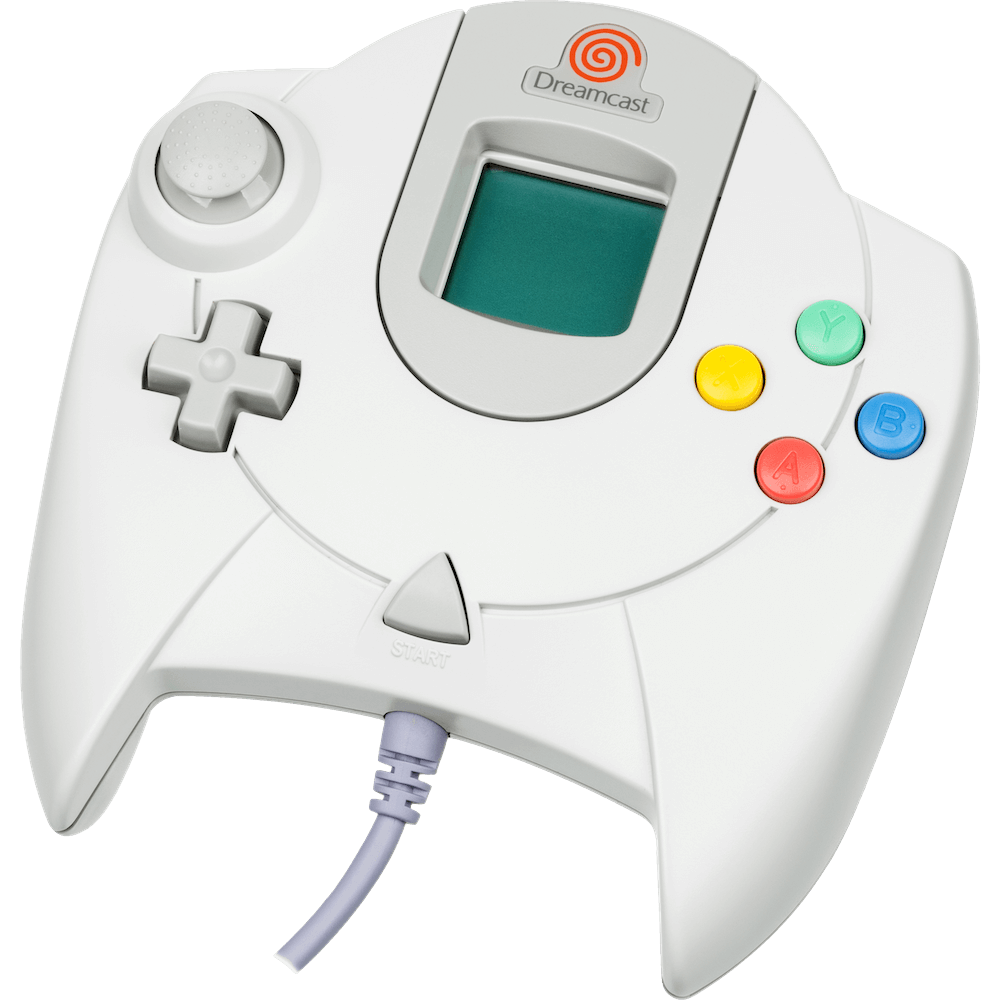
Interactive memory card
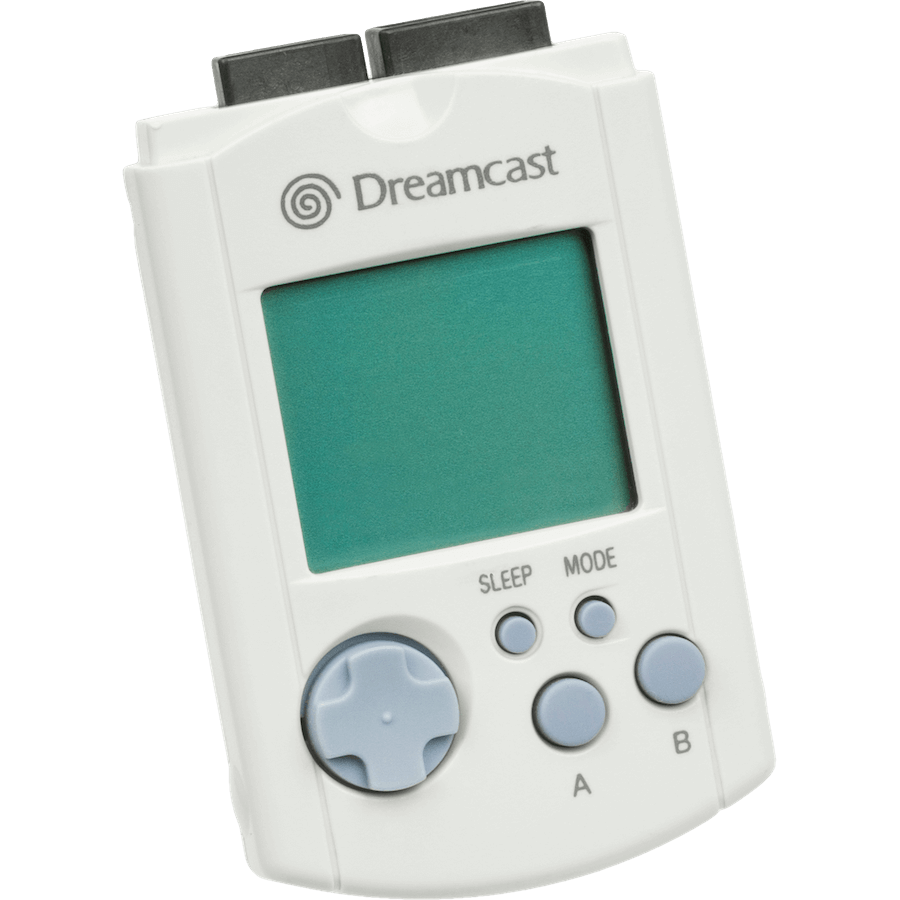
Another innovative feature of the Dreamcast was the Visual Memory Unit or ‘VMU’. It is attached to the controller and, aside from serving as a memory card, is a fully-fledged device that includes [18]:
VMU detached from the controller.Controller without VMU attached.Controller with VMU attached.
A Sanyo LC86K87: An 8-bit low-power CPU.
A 32x48 Monochrome LCD with four additional icons: Commanded using 196 B of XRAM (eXternal RAM) as a frame buffer.
Two serial connectors: One for IN and the other for OUT.
Six physical buttons: Used when the VMU is detached from the controller.
A 16 KB Mask-ROM: Stores the BIOS-IPL.
64 KB of Flash: 32 KB for storing a single program (transferred from the console) and the other 32 KB for keeping Dreamcast’s saves.
512 B of RAM: 256 B is reserved for the system, leaving only 256 B available for the program.
The VMU has two modes of operation:
Attached to the controller: The official controller has two slots to connect VMUs and other accessories with the same shape, if the VMU is inserted on the first slot (visible from the front of the controller), it can display drawings during gameplay. Moreover, the Dreamcast can store saves and a program on the VMU.
Detached from the controller: The gadget becomes a Tamagotchi-like device with a clock and save manager, and can also run whatever program the Dreamcast previously transferred. Two VMUs can be connected to share content as well.
Anti-Piracy & Homebrew
Using the proprietary GD-ROM format helped to inhibit the production of unauthorised copies of games (and running them on other consoles). Dreamcast games are also region-locked meaning that a console will refuse to run a game intended for a different region.
Defeating it
In practice, the anti-piracy measures were utterly useless due to Sega leaving a huge backdoor open: MIL-CD. Music Interactive Live-CD or ‘MIL-CD’ is a format created by Sega to extend an Audio-CD with interactive programs… and the Dreamcast is compatible with it [19].
Eventually, unauthorised commercial discs (cheat loaders, movie players, etc) disguised as MIL-CDs ran on the console without Sega’s approval. Later on, different hacking communities dissected this exploit and came up with a workaround to boot pirated games using CD-ROMs. This caused an unstoppable wave of ISOs to be released on the net.
Some problems surfaced afterwards: Although GD-ROMs can store a gigabyte of data, CD-ROMs can only fit ~700 MB, so how could ‘rippers’ shrink the bigger games to fit on a CD? By re-compressing music and graphics until it fits. They may even try to split it into two discs. After all, game data is not a single blob anymore (like on an old cartridge), but is now organised hierarchically into files and directories.
That’s all folks
A Dreamcast I had to get in order to write lots of stuff here. Not too bad for its age!
I hope you enjoyed reading the article. I finished writing it at the start of my final year at uni.
I’ll probably be very busy from now on, but I do enjoy writing these articles so hopefully you’ll get the next one in a few weeks!
Until next time! Rodrigo
Contributing
This article is part of the Architecture of Consoles series. If you found it interesting then please consider donating. Your contribution will be used to fund the purchase of tools and resources that will help me to improve the quality of existing articles and upcoming ones.
You can also buy the book editions in English. I treat profits as donations.
A list of desirable tools and latest acquisitions for this article are tracked in here:
### Interesting hardware to get (ordered by priority)

- Nothing else, unless you got something in mind worth checking out

### Acquired tools used

- A Dreamcast console with controllers and VMUs (£40)
- A game (Sonic Adventure, £9)
This work is licensed under a Creative Commons Attribution 4.0 International License. You may use it for your work at no cost, even for commercial purposes. But you have to respect the license and reference the article properly. Please take a look at the following guidelines and permissions:
Article information and referencing
For any referencing style, you can use the following information:
Title of article: Dreamcast Architecture - A Practical Analysis
I only ask that you at least state the author’s name, the title of the article and the URL of the article, using any style of choice.
You don’t have to include all the information in the same place if it’s not feasible. For instance, if you use the article’s imagery in a Youtube video, you may state either the author’s name or URL of the article at the bottom of the image, and then include the complete reference in the video description. In other words, for any resource used from this website, let your viewers know where it originates from.
This is a very nice example because the channel shows this website directly and their viewers know where to find it. In fact, I was so impressed with their content and commentary that I gave them an interview 🙂.
Appreciated additions
If this article has significantly contributed to your work, I would appreciate it if you could dedicate an acknowledgement section, just like I do with the people and communities that helped me.
This is of course optional and beyond the requirements of the CC license, but I think it’s a nice detail that makes us, the random authors on the net, feel part of something bigger.
Third-party publishing
If you are interested in publishing this article on a third-party website, please get in touch.
If you have translated an article and wish to publish it on a third-party website, I tend to be open about it, but please contact me first.
It’s always nice to keep a record of changes. For a complete report, you can check the commit log. Alternatively, here’s a simplified list:
### 2024-08-06

- Expanded imagery after visiting Cambridge, UK.

### 2024-01-30

- Expanded information about the SH-4 and Windows CE.

### 2021-30-04

- Improved 'Anti-Piracy' section.
- Added more info on sound drivers.
- Fixed 'sources' structure.

### 2020-09-13

- General revamp with grammar fixes and other tweaks, thanks @dpt.

### 2020-04-10

- Expanded Hidden-Surface Removal section.

### 2020-03-01

- More content about texture effects and audio processing.

### 2019-10-24

- Added some 3d models to fiddle with.

### 2019-10-09

- Correction + Additions regarding GPU transparency, SegaNet and the SDK, thanks /r/dreamcast!

### 2019-10-08

- Added SIMD core

### 2019-10-07

- It's alive!
Rodrigo Copetti
I hope you have enjoyed this article! If you want to know more about the author tap here and if you would like to support him tap here instead